ABLETM
Advanced Bindery Library Exchange
Reference
Guide
Volume 20
Library
Installation
Version 6.6
April 1, 2003
ABLEä Ventures, LLC
Copyright by
ABLEä Ventures, LLC
This reference guide is
copyrighted and all rights are reserved.
This document may not, in whole or in part, be copied, photocopied,
reproduced translated, reduced to any electronic medium or machine readable
form without prior consent, in writing, from the ABLEä Ventures, LLC.
The information in this document is subject to change without notice. The ABLEä Ventures, LLC assumes no responsibility for errors that may appear in this document.
For more information visit the ABLEä web site: http://www.programmingconcepts.com/able/
Or contact,
ABLEä Ventures, LLC
c/o Paul Parisi
ACME Bookbinding
100 Cambridge Street
Charlestown, MA 02129
(800) 242-1821
For technical support contact:
Programming Concepts, Inc.
web site: http://www.programmingconcepts.com/able/
e-mail: able_support@programmingconcepts.com
telephone: 631-563-3800 x230
fax: 631-563-3898
ABLEä
Ventures, LLC
Acme Bookbinding
Information Conservation, Inc.
Kater-Crafts Bookbinders
Lehmann Bookbinding
Mekatronics Inc.
National Library Binding of Georgia
Ocker & Trapp Bindery Library Inc.
Programming Concepts, Inc.
ABLEä is a trademark of
Mekatronics, Inc. / Bendror International Inc. 1987-2001
Table of
Contents
2 Library Installation and Update Instructions
2.1 Library Client Workstations
2.2 Library Web Server / Network File Server
3.1 ABLEä Library Web Installation
3.2 ABLEä Library Standalone and File Server Installation
3.3 ABLEä Library Installation – Post Installation Steps
3.4 Library Client Installation
3.4.1 Library Client
Installation – Post Installation Steps
3.4.2 Update Java
Virtual Machine
3.4.3 Shortcut to
ABLE Library 6.6
3.4.4 Setting ABLEä to always run with Internet Explorer
3.4.5 Enabling the
Java Console
3.5 ABLEä Library Optional Services
3.5.1 FTP Service
Installation
4.1 Web Server Software Installation
4.2 Web Server Setup for ABLEä Client
Access
4.2.1 ABLEä Site Configuration
Release Notes
The ABLEä Reference Guide is comprised of multiple volumes. The collection of volumes describes the functional and operational characteristics of ABLEä. The volumes are:
|
Volume |
Reference
Guide |
File Name |
|
1 |
r6-intro.htm |
|
|
2 |
Library User |
r6-library-user.htm |
|
3 |
r6-user.htm |
|
|
4 |
r6-title.htm |
|
|
5 |
R6-style.htm |
|
|
6 |
r6-report.htm |
|
|
7 |
r6-control.doc |
|
|
9 |
r6-maint.htm |
|
|
10 |
r6-transfer.htm |
|
|
12 |
R6-emboss.htm |
|
|
13 |
r6-help.htm |
|
|
15 |
r6-bill.htm |
|
|
16 |
r6-pm.htm |
|
|
19 |
R6-s3.htm |
|
|
20 |
r6-linstall.htm |
|
|
21 |
r6-binstall.htm |
|
|
22 |
r6-ezcut.htm |
|
|
23 |
r6-ftp.htm |
|
|
24 |
r6-alink.htm |
|
|
25 |
r6-zlink.htm |
Glossary
Library Server The new Library Server machine for this installation.
Library 5.x Server Server machine running ABLEä Library 5.x or earlier.
URL Universal Resource Locater (Web address).
IE Internet Explorer
JVM Java Virtual Machine (used to run ABLEä in the IE browser).
1 Introduction
The ABLEä Library 6 site preparation and installation requirements for all versions of ABLEä 6 Library (and higher versions) are described in this guide. The ABLEä 6 configurations are:
|
ABLEä
Library |
|
Standalone PC (Single PC) |
|
Standalone Network File Server and
Workstations |
|
Internet Access Workstation |
The installation steps are summarized as follows:
Prepare
Site (This
document)
Prepare power for system and install UPS
Prepare and test network wiring for system (network system)
Configure workstation hardware and software
Configure file server (network system)
Configure backup tape drive
Configure modem for remote system support
Install ABLEä
Library Software (This
document)
Setup
System Parameters (File
Maintenance Guide)
General parameters, Fonts, and Tables, Extra/Specials, cloth bin, etc.
Check
Out System Operation (All
systems)
Define a simple Lot/Job, with simple titles and only a few items/pieces.
Go through each process: Create Lot, Edit Items, and print binding slip, Bindery Transfer Control, Reports for Lot.
Train Staff (All
systems)
2
Library Installation and Update Instructions
The Standalone configurations require programs and data files to be installed at the library.
The Web Access version requires minimum installation besides what is listed in the Library Site Installation section.
There are three Standalone Configuration Installation options,
· CD-ROM
· Binder Internet
· ABLEä Internet
The Installation Tools include,
Documents
Library Installation Guide
Release Notes
Standalone Configuration (PC and
Network)
CD-ROM With the ABLEä Library programs, Database, Test Account and the IE Browser swing files / VM
Diskettes New Installations: With the bindery and library specific parameters: account record, title database, fonts, classes, etc. The diskettes are prepared by the associated bindery.
Binder Internet Site* The programs and files (as per the CD-ROM and Diskettes) are on the binders web site for the library. The library logs onto the binders web site. The logon identifies the library account. The installation is similar to the CD-ROM installation.
ABLEä Internet* Installation of ABLEä as per the CD
Installation. You can also install the
latest swing files and VM only if required.
* This installation is the same as using the
CD-ROM except that the time to download the installation files may be very long
without a high speed Internet connection (23+ Mbytes).
|
Options |
New Installation |
Upgrade from 5.1 |
Upgrade V6.x |
Comment |
|
ABLEä Programs |
Yes |
Yes |
Yes |
|
|
ABLEä Database |
Yes |
No |
No |
Overwrites any
existing database |
|
Browser Extensions |
Yes |
Yes |
Yes |
See section 2.1 |
|
Utilities |
Yes |
Yes |
Yes |
FTP utilities. |
2.1 Library Client Workstations
The following is a list of recommended hardware and software for the standalone PC, standalone networked, and internet access workstations.
|
Pentium
III |
|
|
17" monitor |
A
smaller monitor may be more difficult to read. |
|
Windows 95, 98, NT Workstation, 2000 Professional |
Versions supported are: Windows 95 Release 2 Windows 98 Release 2 Windows NT 4.0 Workstation - Service Pack 6 Windows 2000 Professional – Service Pack 2 |
|
Internet Explorer v5.5 (latest release) |
Latest release is 5.5. IE 4.01 is a minimum. |
|
Disk |
The disk only contains the OS and associated tools. A minimum disk can be used. |
|
RAM |
64 MB minimum. 128MB minimum recommended. |
|
CD-ROM |
Any speed. |
|
Network Interface Card |
|
|
Floppy Drive |
3 ½ Floppy Drive |
|
Mouse / Keyboard |
|
|
Video |
1024 x 768 resolution |
|
|
|
2.2 Library Web Server / Network File Server
The following is a list of recommended hardware and software is for the Library Web Server.
|
Pentium III |
A Pentium III of at least 700 Mhz. |
|
17" monitor. |
A smaller monitor may be more difficult to read. |
|
Windows 2000 Server |
Windows 2000 Server Service Pack 3 recommended. Windows 2000 Server. |
|
Disk: 40 Gbytes |
The size of the hard disk can be determined by estimating the size of your database plus the operating system disk requirements. |
|
RAM |
512 Mbytes minimum, 1 GB or more recommended. |
|
CD-ROM |
Any speed. |
|
Web Server Software |
IIS 5.0 |
|
Network Interface
Card |
For standalone network version: Thin-wire or RJ11 (10BaseT) |
|
Floppy Drive |
3 ½ Floppy Drive |
|
Mouse / Keyboard |
|
|
Video |
1024 x 768 resolution |
|
Tape Backup |
For backup of
data. |
2.3 Library Standalone
|
Pentium
III |
A Pentium III of at least 600 Mhz. |
|
17" monitor. |
A smaller monitor may be more difficult to read. |
|
Windows 98, NT, or 2000. |
Windows 98 is a minimum. Windows 95 is NOT supported for Standalone installations. |
|
Disk: 2 Gbytes |
The size of the hard disk can be determined by estimating the size of your database plus the operating system disk requirements. |
|
RAM |
256 Mbytes minimum, 512 or more recommended. |
|
CD-ROM |
Any speed. |
|
Web Server Software |
Internet Information Server (IIS) 4.0 or later. IIS 5.0 is recommended for Windows 2000. |
|
Network Interface Card |
For standalone network version: Thin-wire or RJ11 (10BaseT) |
|
Floppy Drive |
3 ½ Floppy Drive |
|
Mouse / Keyboard |
|
|
Video |
1024 x 768 resolution |
|
Tape Backup |
For backup of data. |
2.4 Network Components
The recommended
network components are as follows,
|
Component |
Description |
|
Firewalls |
Internet Access Library System Isolation (Highly Recommended) Your network manager will recommend a firewall to use.. |
|
Router |
Your network manager will recommend a router to use |
3 ABLEä Library Installation
The Library installation is broken down into four types: Web Server, File Server, Standalone PC, and Library Web Client install. Follow the appropriate instructions described further in this document according to the installation type. Follow the Library Web Client install for each PC accessing the Library Server.
3.1 ABLEä Library Web Installation
You must be logged into an account with Administrator privileges before installing ABLEä Library Web Server.
Note: The Library web server installation must occur
on a different machine than the Bindery web server. Bindery and Library may not reside on the same physical machine.
It is highly recommended that ABLEä
Library and SQL Server 2000 be installed on its own dedicated machine.
SQL Server 2000 must be installed
prior to ABLEä
Library Web Server installation.
See Appendix B for SQL Server 2000 installation procedures.
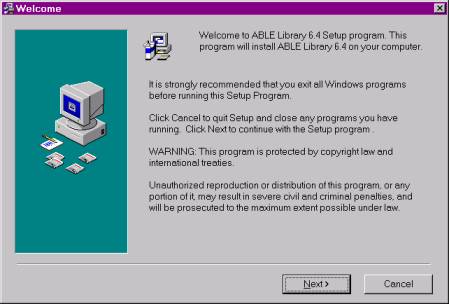
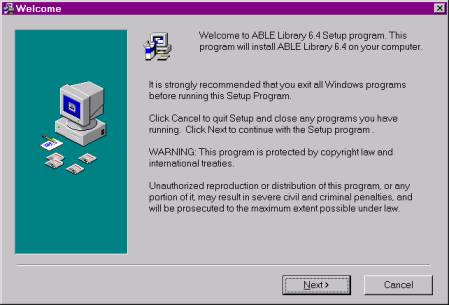
Step 1. - Welcome
Insert the ABLEä Library installation CD into the CD drive. Go to StartàRun and enter
<CD Drive Letter>:\setup.exe
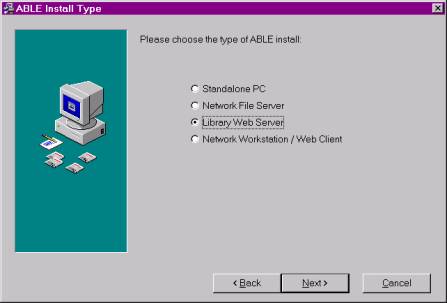
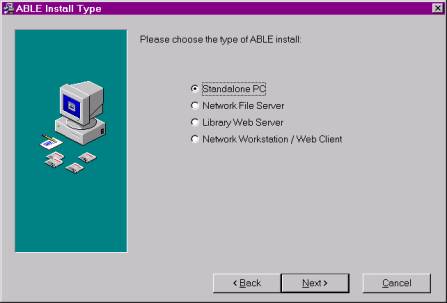
Step 2. – ABLE Install Type
Select the desired type of Library Installation and click Next to continue.
Step 3. – Choose Destination Location
Select the destination folder for the Library Server software. The default is C:\Able\Library and should be used. Click the Browse… button to change the folder. Click Next to continue.

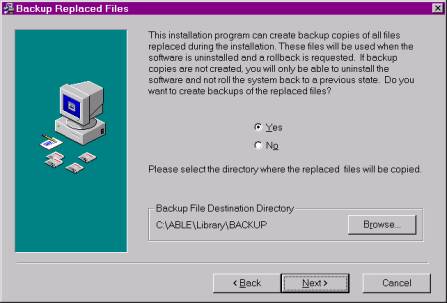
Step 4. – Backup Replaced Files
The setup confirms to backup files replaced during this installation. The default is “YES” and should not be changed. An uninstall will not be possible without this option checked.

Step 5. – Select Components
There are four components to the ABLEä Library installation.
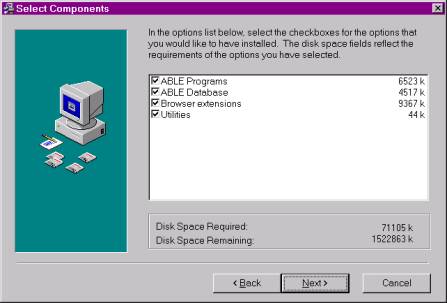
The ABLE Programs option should be checked at all times.
For new Library Server 6.6 installations, the ABLE Database option is checked by default. This option will not overwrite the ABLE 5.x or 6.3 database files should they exist. Leave this option checked for new 6.6 installations.
The Browser Extensions option is
checked at all times. This option will
install files needed by the browser to run ABLEä.
Folders created during the Library Server installation:
|
Components |
Folder |
Description |
|
ABLE Programs |
Able\Library\server Able\Library\client |
ABLE Library Server components. ABLE client consisting of: Able.cab Library.htm a.js |
|
ABLE Database |
Able\Library\DataSQL Able\Library\data6 Able\Library\data |
ABLE 6.6 data files ABLE 6.3 data files ABLE 5.x data format files. |
|
Browser Extensions |
C:\swing |
Java files needed by Internet Explorer for running ABLE client. These are: Swing.jar Windows.jar Zlink.jar LinearBarCode.jar Xbasej.jar |
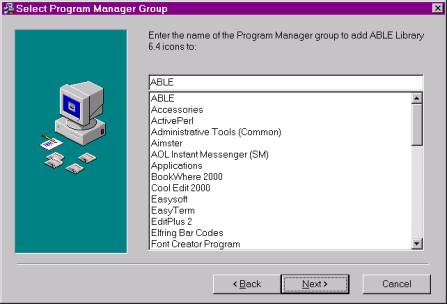
Step 6. – Select Program Manager Group
Enter the name of the group to place the ABLE icons (under StartàPrograms). Use the default of ABLE.
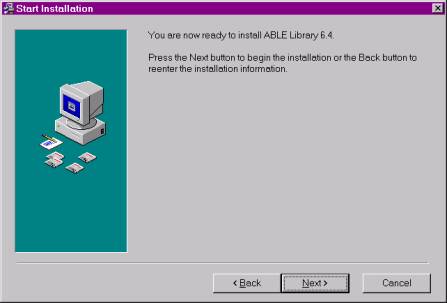
Step 7. - Start Installation
You are now ready to install ABLEä Library Server. Click the Next button to start the install.

Step 8. - Exit Installation
After the installation completes, reboot the machine as requested.
3.2 ABLEä Library Standalone and File Server Installation
ABLEä Library standalone and File server versions use the SQL Server 2000 Desktop engine. This must be installed prior to ABLEä.
Step 1. - SQL Server 2000 Desktop Installation
Insert the ABLEä CD into the CD drive. To start the SQL Server 2000 Desktop installation go to StartàRun and enter:
<CD Drive Letter>:\SQL2000\setup.exe
There is no user intervention necessary during the installation. When the installation completes, reboot the machine (you may not be asked to do so).
Step 2. – Start SQL Server 2000
Once you have rebooted, the SQL Server Service Manager icon appears on the taskbar:
![]()
If the image has a circle with a red dot in the middle (pictured above), then SQL Server 2000 is not started. Double click on the icon to bring up the SQL Server Service Manager. The following window appears:

Check the “Auto-start service when OS starts” option (pictured above) and click the green arrow button to Start SQL Server 2000. Once started, close the window by clicking on the X. The icon on the taskbar should now appear as below.
![]()
This step only needs to be done once. SQL Server 2000 will start automatically each time the machine is booted.
Step 3. – Install ABLEä Standalone or File Server
Insert the ABLEä Library installation CD into the CD drive. Go to StartàRun and enter
<CD Drive Letter>:\setup.exe.
Step 4. - ABLEä Install Type
Select the desired type of Library Installation and click Next to continue. For File Server installation, select “Network File Server”.
Step 5. – Choose Destination Location
Select the destination folder for the Library Server software. The default is C:\Able\Library and should be used. Click the Browse… button to change the folder. Click Next to continue.

Step 6. – Backup Replaced Files
The setup confirms to backup files replaced during this installation. The default is “YES” and should not be changed. An uninstall will not be possible without this option checked.
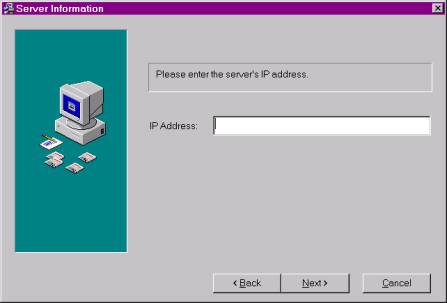
Step 7. – Server Information
This screen only appears for “Network File Server” installation. Enter the IP address of the Network File Server machine.
Step 8. – Select Components
There are four components to the ABLEä Library installation.

The ABLE Programs option should be checked at all times.
For new Library Server 6.6 installations, the ABLE Database option is checked by default. This option will not overwrite the ABLE 5.x database files should they exist. Leave this option checked for new 6.6 installations.
The Browser Extensions option is
checked at all times. This option will
install files needed by the browser to run ABLEä.
Folders created during the Library Server installation:
|
Components |
Folder |
Description |
|
ABLE Programs |
Able\Library\server Able\Library\client |
ABLE Library Server components. ABLE client consisting of: Able.cab Library.htm a.js |
|
ABLE Database |
Able\Library\DataSQL Able\Library\data6 Able\Library\data |
ABLE 6.6 data files ABLE 6.3 data files ABLE 5.x data format files. |
|
Browser Extensions |
C:\swing |
Java files needed by Internet Explorer for running ABLE client. These are: Swing.jar Windows.jar Zlink.jar LinearBarCode.jar Xbasej.jar |
Step 9. – Select Program Manager Group
Enter the name of the group to place the ABLE icons (under StartàPrograms). Use the default of ABLE.

Step 10. - Start Installation
You are now ready to install ABLEä Library Server. Click the Next button to start the install.
Step 11. - Exit Installation
After the installation completes, reboot the machine as requested.
3.3 ABLEä Library Installation – Post Installation Steps
Follow these steps for web server, standalone, and network file server installations.
3.3.1 Conversion Utilities
The follow steps are used to convert to the ABLEä 6.6 data format. Pre 5.x data files must be converted to 5.x format using the CONVERT5 utility provided with the ABLE 5 installation disks before continuing.
3.3.1.1 Converting from ABLEä 6.5
The updatedb66.bat
file is used to convert from ABLEä 6.5 to 6.6.
If converting from version 6.4, the database must first be converted to
version 6.5 (see section 3.3.1.2). Perform the
following steps to convert from 6.5 to 6.6.
Note: These steps are only necessary if updating
from a version prior to 6.5. If
updating from 6.5, the installation process does this procedure automatically.
- Go to a command prompt and go to the able\library\server directory on the Bindery web server.
- Enter: updatedb66 and hit enter.
- When the process completes, the database has been upgraded. All information is logged to the updatedb66.log file in the same directory.
3.3.1.2 Converting from ABLEä 6.4
The updatedb65.bat file is used to convert from ABLEä 6.4 to 6.5. Perform the following steps:
- Go to a command prompt and go to the able\library\server directory on the Bindery web server.
- Enter: updatedb65 and hit enter.
- When the process completes, the database has been upgraded. All information is logged to the updatedb65.log file in the same directory.
IMPORTANT Font5toSQL must be run again on all fonts and the global
font table before running ABLEä 6.5. See steps 3 and 4 in the
ASCII file conversion section (3.3.1.7) for instructions on running this utility.
3.3.1.3 Converting from ABLEä 6.3 Web, Standalone, or File Server to 6.6
1. Open
an MS-DOS Command Prompt window.
2. When
the Command Prompt window is displayed, at the command line, change directory
to the \Able\Library\Server directory.
3. Type in “db63toSQL -all”.
4. Messages will be displayed in the DOS window reporting the status of the conversion.
5. The last message will report whether or not the database conversion was successful.
6. If the conversion of all data files succeeds, then the conversion is complete.
3.3.1.4 Converting from ABLEä 5.x, 6.0, or 6.11 Web, Standalone, or File Server to 6.6
1.
Open an MS-DOS Command Prompt window.
2. When
the Command Prompt window is displayed, at the command line, change directory
to the \Able\Library\Server directory.
3. Type in “db5toSQL -all”.
4. Messages will be displayed in the DOS window reporting the status of the conversion.
5. The last message will report whether or not the database conversion was successful.
6. If the conversion of all data files succeeds, then the conversion is complete.
3.3.1.5 Adding ABLEä 5.x, 6.0, or 6.11 accounts to ABLEä Library Web 6.6
When adding an account to the Library Web, the account must first be mapped to a Library ID using the Control Services. Refer to the Control Services Guide for information on mapping accounts.
1. Copy the account’s data files to the able\library\data directory. See the list below for data files needed.
2. When the account has been created and properly mapped to a Library ID, go to a Command Prompt window and type in “db5toSQL –new <account name>”
3. Messages will be displayed in the DOS window reporting the status of the conversion.
4. The last message will report whether or not the database conversion was successful.
5. If only title files are being converted for an account, use the “db5toSQL –title <account name>” command.
The following files are converted with the –new option for an account. These files must be gotten from the customer.
File
<account>.ttl
codes.btr
deltitle.btr
stand.btr
hist.btr
jobh.btr
lotd.btr
loth.btr
auth.btr
3.3.1.6 Adding ABLEä 6.3 accounts to ABLEä Library Web 6.6
When adding an account to the Library Web, the account must first be mapped to a Library ID using the Control Services. Refer to the Control Services Guide for information on mapping accounts.
1. Copy the account’s data files to the able\library\data6 directory. See the list below for data files needed.
2. When the account has been created and properly mapped to a Library ID, go to a Command Prompt window and type in “db63toSQL –new <account name>”
3. Messages will be displayed in the DOS window reporting the status of the conversion.
4. The last message will report whether or not the database conversion was successful.
5. If only title files are being converted for an account, use the “db63toSQL –title <account name>” command.
The following files are converted with the –new option for an account. These files must be gotten from the customer.
File
<account>.ttl
Extras.dat
Class.dat
Category.dat
Department.dat
Exclusions.dat
Leaf.dat
deltitle.dat
format.dat
hist.dat
jobh.dat
lotd.dat
loth.dat
user.dat
3.3.1.7 ASCII File Conversions
If converting from
ABLEä 6.3 or 6.5 Web, Standalone, or File Server,
skip this section; the font tables are already part of the database.
All ASCII files are converted to database tables. These are:
Font
files
Global
font table
Limit tables
Height tables
The Font_tbl utility is used to convert all of the above ASCII files into database tables. To convert these files perform the following steps on the new Library Server machine:
1. Copy all font, height, and limit tables used in ABLE 5.x into the able\library\data directory on the new Library Server machine.
2. Go to the able\library\data directory.
3. Convert all the font files (one at a time) by typing Font5toSQL – font <font name>. The font name is the name of the font file without the FNT extension. Do this step for each font file.
4. Convert the Global Font file by typing Font5toSQL –global.
5. Convert the Height tables by typing Font5toSQL –height <table name>. The table name is the name of the height table file without the HTS extension.
6. Convert the Limit tables by typing Font5toSQL –limit <table name>. The table name is the name of the limit table file without the LMT extension.
3.4 Library Client Installation
Follow these steps for each PC accessing the Library Server.
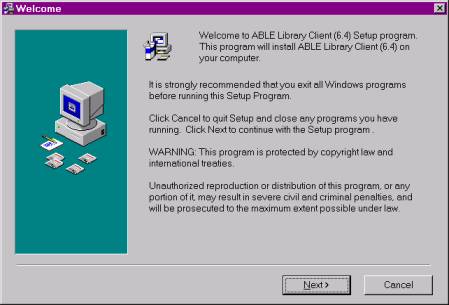
Step 1. - Welcome
Insert the ABLEä Library installation CD into the CD drive. Go to StartàRun and enter:
<CD Drive
Letter>:\clientsetup.exe
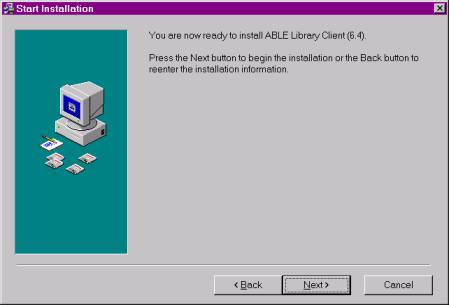
Step 2. - Start Installation
You are now ready to install ABLEä Library Web Client. Click the Next button to start the install.
Step 3. - Exit Installation
Exit the installation and reboot the machine if requested.
Folders created during the Library Server installation:
|
Default
Components |
Folder |
Description |
|
Browser Extensions |
C:\swing |
Java files needed by Internet Explorer for running ABLE client. These are: Swing.jar Windows.jar Zlink.jar LinearBarCode.jar Xbasej.jar |
3.4.1 Library Client Installation – Post Installation Steps
Post installation procedures for Library Client installation.
3.4.2 Update Java Virtual Machine
The Java Virtual Machine (JVM) is needed to run ABLEä in the IE browser. Use the Windows Update utility (“ToolsàWindows Update” from within Internet Explorer) to get the latest version of the Java VM.
3.4.3 Shortcut to ABLE Library 6.6
Do the following if the installation did not create a shortcut on your desktop. To create a shortcut on the desktop, perform the following steps:
1. Go to the desktop, right click, and choose NewàShortcut,
2. In
the Command Line box, type in the URL to ABLE Library. For example,
http://www.mybinder.com/Library.htm
3. Proceed
by choosing Next and naming the
shortcut ABLE Library, and
4. Finish
by choosing Finish.
At this point you should have a shortcut on the desktop titled ABLE Library that references the ABLEä system on the server. You could also optionally add this as a favorite in Microsoft's Internet Explorer (IE) by loading the page and then choosing FavoritesàAdd to Favorites….
3.4.4 Setting
ABLEä to always run
with Internet Explorer
ABLEä Library only runs using the Internet Explorer browser. Netscape Navigator is not supported. On some client machines, Netscape is already set up to be the default browser. To have ABLEä Library always run with IE, do the following:
1. If Internet Explorer is not installed on the machine, install the latest version from Microsoft’s site.
2. Delete the ABLEä Library shortcut on the desktop if it exists.
3. Right click on the desktop and select NewàShortcut.
4. In the first box that comes up, click the Browse button and search for iexplore.exe (it should be in “C:\Program Files\Plus!\Microsoft Internet” directory. Once you select it, go to the end of that line and type in the URL to ABLE Library. If http://www.mybinder.com/Library.htm is the URL for ABLEä Library, the whole line should now read
“C:\Program Files\Plus!\Microsoft
Internet\iexplore.exe” http://www.mybinder.com/Library.htm
5. Click the Next button. Type in a name for this shortcut, such as ABLE Library.
6. Click the Finish button. A new shortcut should be on the desktop. Double click it to make sure it brings up ABLEä with IE.
3.4.5 Enabling the Java Console
At times it may be necessary to log events that happen in ABLEä for technical assistance from the ABLEä support team. The Java Console is where all warnings, errors, etc… are sent and must be enabled to view its contents. To enable the Java Console, do the following:
q Exit all instances of Internet Explorer.
q Right click on the Internet Explorer icon on the desktop and select Properties.
q Choose the Advanced tab.
q Scroll down the list until you see the Java Console Enabled (requires restart) option (see picture below).
![]()
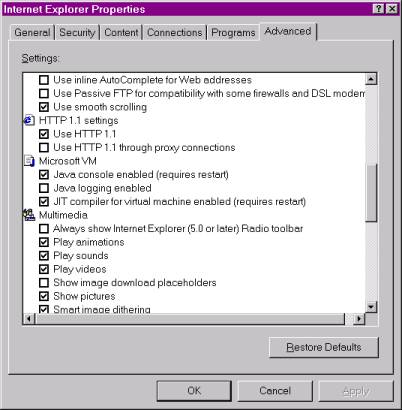
q Check the box to the left of this message.
q Click Apply, then OK. Close this dialog box.
q The next time IE is run, the Java Console will be enabled.
3.5 ABLEä Library Optional Services
This section outlines installation procedures for any Library optional services. Current optional services are:
FTP Service
3.5.1 FTP Service Installation
The installation of ABLEä Library web server placed a shortcut to the FTP Service installation program in the ABLEä Library Program Manager group.
The FTP Service installation program installs the FTP Service on the Library web server machine. Currently supported operating systems are Windows NT Server and Windows 2000 Server. The FTP Service runs as a background service that can be configured through Windows Control Panel.
Step 1. - Welcome
Click on the “Setup ABLE FTP Service” icon in the ABLEä Library Program Manager group. The installation will start automatically.

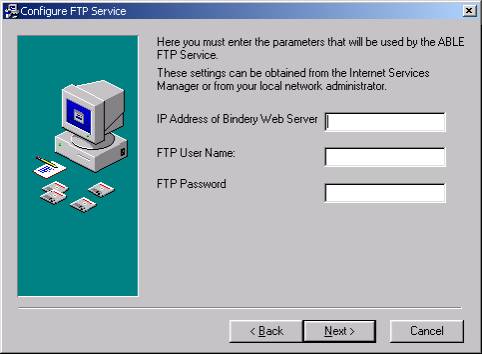
Step 2. – Configure FTP Service Parameters
Enter the IP Address of the machine which is running Bindery web server. Then, type in a name of a user who has permission to log on the FTP Server. Finally, enter the password for this user. If necessary, contact your System Administrator for this information. Click Next to continue.
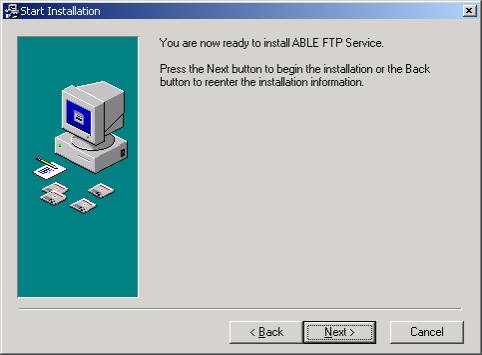
Step 3. - Start Installation
You are now ready to install ABLEä FTP Service. Click the Next button to start the install.
Changes made during the FTP Service installation:
|
Component |
Description |
|
FTP Service |
AbleFtpService.exe copied to directory of the Library Server. ABLE FTP Service added to list of services found through Control Panel. Service is started. Service is set to run automatically when Library Web Server machine starts up. |
4 Web Server Configuration
The following sections provide steps for configuring the web server for access by ABLEä clients.
4.1 Web Server Software Installation
Follow manufacturers directions for installing Windows software, browser, and Internet Information Server (IIS) 4.0 or later.
4.2 Web Server Setup for ABLEä Client Access
There are two steps involved in setting up ABLEä for client access. The first is to set up an ABLEä site or virtual directory. The second is to set up an FTP area for lot transfers.
4.2.1 ABLEä Site Configuration
In order to access ABLEä via the web, a new site or virtual directory must be set up. This allows clients to access ABLEä using a URL. For example, if your domain is mybinder.com, you might set up ABLEä to be accessed using http://www.mybinder.com/able/Library.htm.
The ABLEä installation places the ABLE web page in the able\Library\client directory. In here you will find the following files:
Library.htm
Able.cab
a.js
When setting up the ABLEä web, the newly created site or virtual directory must point to the able\Library\client directory. Follow manufacturers directions for setting up a new site or virtual directory.
4.2.2 FTP Configuration
The ABLEä Library web server must have an FTP Server configured for Internet Lot Transfer. Follow manufacturers directions for setting this up. Once the FTP Server is configured, two virtual directories must be configured.
The virtual directories are configured as follows. The names of the virtual directories must be as is (use the hyphen, not the underscore):
· Ftp-in Virtual directory points to able\Library\transfers\in
· Ftp-out Virtual directory points to able\Library\transfers\out
Appendix A. Additional Web Server Software
It is recommended that remote access software such as Symantec’s pcAnywhere be installed on the web server for ABLEä support by Programming Concepts, Inc.
Appendix B. SQL Server 2000 Installation
SQL Server 2000
Standard or Enterprise Edition is supported under Windows 2000 Server and
Windows NT Server. It is optimized for
Windows 2000 Server. The following
procedure outlines the basic steps required for SQL Server 2000
installation. Depending on the version
and licensing options for SQL Server 2000, some screens may be different or not
included in these procedures.
SQL Server 2000
uses a great deal of system memory. In
order to avoid low virtual memory messages and a decrease in system
performance, set the Virtual memory to a minimum of 1.5x the
actual amount of memory present in the machine.
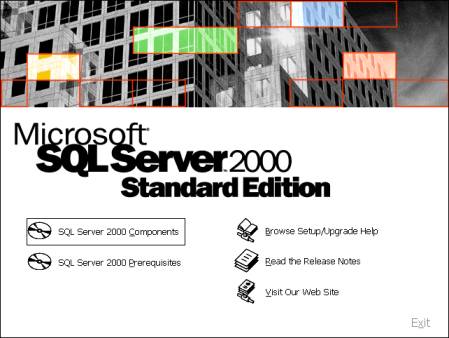
Step 1. Select SQL Server 2000 Installation
Insert the CD-ROM for SQL Server 2000. The installation should start automatically. If it does not, run the Setup manually.
Choose the “SQL Server 2000 Components” option as highlighted below.
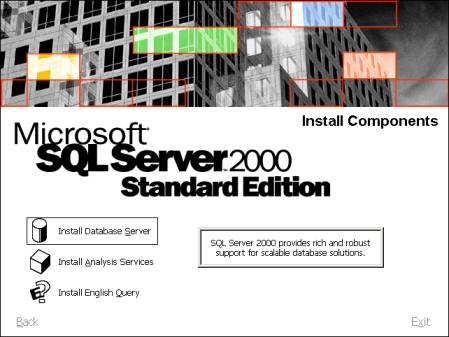
Step 2. Select SQL Server 2000 Option
Select the option to install the Database Server as highlighted below.
Step 3. Welcome
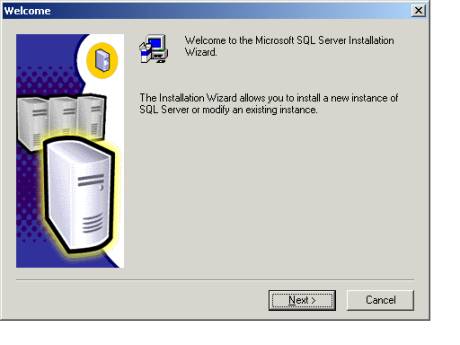
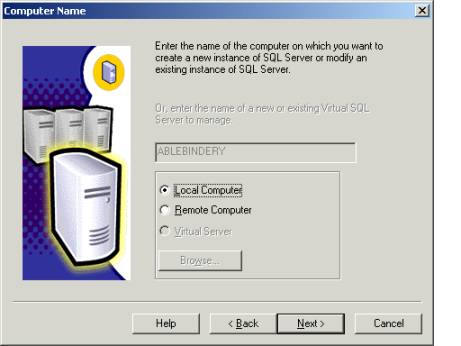
Step 4. SQL Server Computer Name
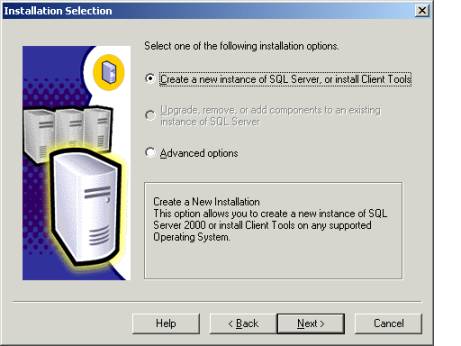
Step 5. Installation Selection
Select “Create a new instance of SQL Server….” option as highlighted below.
Step 6. Select Type of Installation
Select the “Server and Client Tools” option as highlighted below.

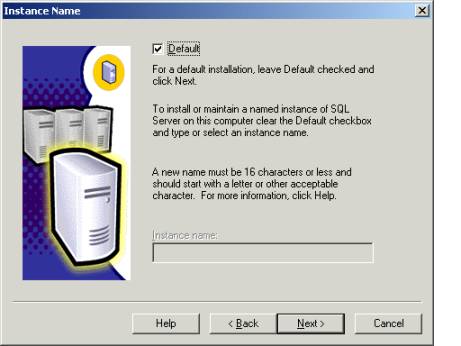
Step 7. Instance Name
Select option for Default installation as highlighted below.
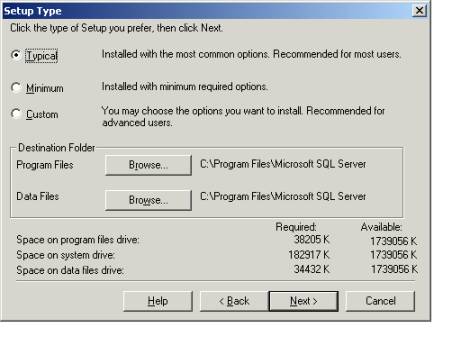
Step 8. Setup Type
Select the option
for “Typical” installation. This will
install all options required for use with ABLEä. You
may choose “Custom” if you wish to add additional options. Leave the path names for Program Files and
Data Files as is.
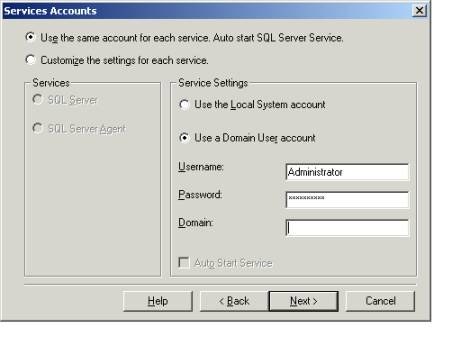
Step 9. Services Accounts
Select the “Use
the same account for each…” and “Use a Domain User account” options as
highlighted below. Enter the
Administrator password and Domain name in the text boxes. You may choose the “Use the Local System
account” option if you wish.
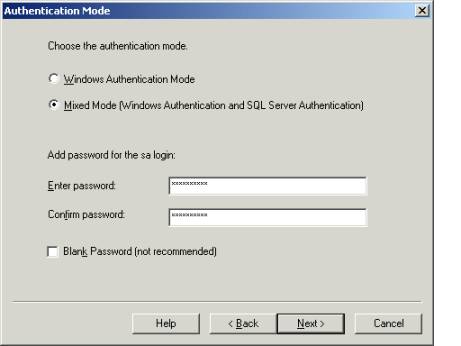
Step 10. Authentication Mode
Select the “Mixed
Mode” option to allow privileged Windows account and SQL Server logins access
to the database. In the “Enter
password” and “Confirm password” text boxes, enter the password for the “sa”
(System Administrator) SQL Server login.
Blank passwords are allowed but not recommended.
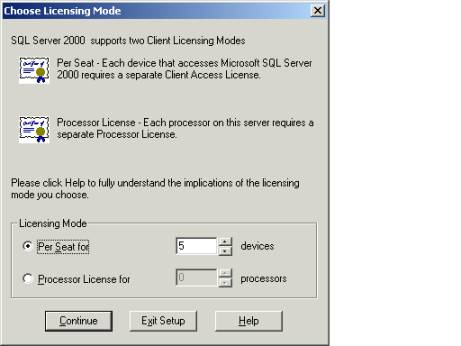
Step 11. Choose Licensing Mode
Enter the appropriate information for your licensed version of SQL Server 2000. If you purchased SQL Server 2000 Standard with 5 CAL pack, enter “5” for “Per Seat”.
Step 12. Continue Installation
Continue with installation. After SQL Server 2000 is installed, reboot machine. The next time you log in, you will see the SQL Server 2000 icon on the taskbar.
Appendix C. Troubleshooting
|
Problem |
Solution |
|
Library Web Server option is grayed out. |
Library Web Server option is only available on Windows NT and 2000. If the above is true and the option is still grayed out, then you do not have Administrator privileges. Log into an account with Administrator privileges. |
|
After installing ABLE Library Client, I do not see an icon on the desktop for ABLE. |
The ABLE installation does not place an icon on the desktop. See the Shortcut to ABLE Library 6.3. section for instructions on setting this up. |
|
When I run ABLE, I just get a gray screen that has “Done” at the bottom of the page or an error box appears in IE. |
Most likely the CLASSPATH environment variable is not set up properly. Check the Java Console in IE and contact ABLE Support at able_support@programmingconcepts.com. |
|
ABLE keeps running with Netscape or another browser other than IE. |
ABLE is only supported with IE. See Setting ABLE to always run with Internet Explorer. |
|
Can’t log into ABLE after upgrade. |
The client’s browser may be caching an older copy of some ABLEä web files. To clear out the IE cache, do the following:
|