ABLETM
Advanced Bindery Library
Exchange
Reference
Guide
Volume 4
Title Composition
Version 6.6.2
ABLEä Ventures, LLC
Copyright by ABLEä Ventures, LLC
This reference guide is copyrighted and all rights are
reserved. This document may not, in
whole or in part, be copied, photocopied, reproduced translated, reduced to any
electronic medium or machine readable form without prior consent, in writing,
from the ABLEä
Ventures, LLC.
The information in this document is subject to change without notice. The ABLEä Ventures, LLC assumes no responsibility for errors that may appear in this document.
For more information visit the ABLEä web site: http://www.programmingconcepts.com/able/
Or contact,
ABLEä Ventures, LLC
c/o Paul Parisi
ACME Bookbinding
(800) 242-1821
For technical support contact:
Programming
Concepts, Inc.
web site: http://www.programmingconcepts.com/able/
e-mail: able_support@programmingconcepts.com
telephone: 631-563-3800 x230
fax: 631-563-3898
ABLEä
Ventures, LLC
Acme Bookbinding
Information Conservation, Inc.
Kater-Crafts Bookbinders
Lehmann Bookbinding
Mekatronics Inc.
National Library
Binding of
Ocker & Trapp Library Bindery Inc.
Programming Concepts, Inc.
ABLEä
is a trademark of Mekatronics, Inc. / Bendror International Inc. 1987-2001
1.1 Summary of Title Record Services
1.2 Summary of Format Services
1.4 Summary of Job Services (ABLE™ Bindery)
1.6 Class Field Processing Description
1.6.2 No Touch Class (ABLE Bindery)
2.1.6
Title library barcode key
2.3 Item and Piece Record Retrieval
3.2 Level Entry and Validation
3.3 Fonts and Font Character Validation
3.4 Subscript, Superscript and Font Substitution
3.9 Spine Boundary Limit Checking
3.10 Automatic Text Fitting Rules
3.11 Title Text Composing Services
3.11.2 Keyboard Editing Services
4. Main Screen and Title Services
5.2 Lot and Job Status (Bindery Only) Screens
6. Miscellaneous Title Composition Services
6.4 Persistent User Parameters
Appendix A -
Universal Binding Slip (UBS)
Release Notes
V6.0 Preliminary release for review.
V6.01 Changes for ABLEä release 6.01.
V6.02 Changes for ABLEä release 6.02.
V6.4 Changed copyright.
V6.6.1 Removed section pertaining to single character words making up text key.
V6.6.2 Added section for single character words making up text key
The ABLEä Reference Guide is comprised of multiple volumes. The collection of volumes describes the functional and operational characteristics of ABLEä. The volumes are:
|
Volume |
Reference Guide |
File Name |
|
1 |
r6-intro.htm |
|
|
2 |
Library User |
r6-library-user.htm |
|
3 |
r6-user.htm |
|
|
4 |
r6-title.htm |
|
|
5 |
R6-style.htm |
|
|
6 |
r6-report.htm |
|
|
7 |
r6-control.doc |
|
|
9 |
r6-maint.htm |
|
|
10 |
r6-transfer.htm |
|
|
12 |
R6-emboss.htm |
|
|
13 |
r6-help.htm |
|
|
15 |
r6-bill.htm |
|
|
16 |
r6-pm.htm |
|
|
19 |
R6-s3.htm |
|
|
20 |
r6-linstall.htm |
|
|
21 |
r6-binstall.htm |
|
|
22 |
r6-ezcut.htm |
|
|
23 |
r6-ftp.htm |
|
|
24 |
r6-alink.htm |
|
|
25 |
r6-zlink.htm |
|
|
27 |
r6-file-import.htm |
1. Title Composition Screen
The Title Composition screen provides a wide variety of Title, Item and Piece services. Its primary service is the process of identifying Titles within ABLEä and specifying the layout of the embossed text. Stored Titles are used for periodicals, although any Title can be stored in the ABLEä Library Title database.
ABLEä Library transient
Titles, called Items are used on a
one-time basis during
The Title Composition program for ABLETM Bindery is similar to the program for ABLETM Library. The screen layout differences are: a Job Status area is displayed, Job and Piece information is displayed, and additional alternative menu selections are available. (Note that the Job Piece, Scan and Lot Item identifiers point to the same physical Lot Detail record.)
The Title Composition functions are utilized from the Title Composition screen. The basic services provided by this screen are:
Title File Services
- add, change, and delete Titles
- view Title information
- view binding history data
- view Cover Image
- change a volume format and variable data
- open, close and update
- add Titles to a
- add, update and delete Lot Items
- print a UBS for an Item
- re-print a UBS for an Item
- align UBS form
Catalog Retrieval Services (Optional for ABLETMLibrary & Bindery)
- retrieve catalog information to create Titles or Items/Pieces
Job Services (ABLETMBindery)
- open, close, update Job
1.1 Summary of Title Record Services
The basic Title functions are:
Select a Title For a
The Add
Item function causes the Title record to be scheduled for binding and a
UBS to be printed (if printing is selected). The Item is added to the currently
open
ABLETM Bindery: The Add Item/Piece function causes the Title record to be placed into the current Job.
Add a New Title
The Add Title function is used to add a new Title record to the Title file. The operator is prompted to verify that the operation is desired. If so, the record is added to the Title file. Upon saving the Title, the font, font characters, spacing, placement and variable syntax are verified. If an error is detected, the Title must be corrected.
New Titles can be created from:
Initial Data Entry
Format
Another Title or
Item
Catalog/Circulation
System or AVIAC Record
When created from initial entry, the operator bypasses the Key field and enters the fields required to define the volume. A Format may be selected to assist in the entry of the data (see below for an explanation of formats.)
A Title is created from another Title or Item record in either the same Account or for a different Account. The Title or Item Record to use as a template is retrieved, edited, then Add Title is selected. For placing the new Title into another Account, the Account is changed before Add Title is selected.
A Title (or
Item) Record is created from the Libraries catalog system by Window:
Z-Link (Alt-Z) to retrieve
the record. A Format is usually first
selected so the data can be selected and displayed in the appropriate Title
record fields. Similarly, a record can be imported from an AVIAC standard file
by Window: A-Link (Alt-Shift-Z).
Update a Title
The Update Title function is used to modify an existing Title record. The desired Title is retrieved, and the operator changes whatever fields need to be changed. Selecting the Update Title function causes the Title to be updated and saved in the Title file. (Upon saving the Title, the font, font characters, spacing, placement and variable syntax are verified. If an error is detected, the Title must be corrected.
Delete a Title
The Remove Title function is used to remove records from the Title file. The Title to be deleted is brought up to the screen, and the Remove Title key is pressed. The operator is then prompted to verify that the operation is desired. If so, the record is deleted from the Title file.
Synchronizing the Library and Bindery
Title Database
Whenever a Title record is successfully deleted, the identifying Account ID and Title ID are placed into the Deleted Title file. This information is transferred between the Library and Bindery to automatically provide the synchronization of their databases; i.e., the Title records deleted at the Library will automatically be deleted at the Bindery and vice versa. Refer to the Bindery Transfer Reference Guide for more information.
Future Release: Updated and New Titles will be synchronized between the Library and the Bindery.
1.2 Summary of Format Services
Often, periodical Titles are formatted according to certain rules. These rules include placement, levels, print colors (foils), and cloth cover material colors, type sizes and styles. To ease the burden of repetitive entry, the ABLETM system has a feature called "formats". A Format is a template for a Title, and contains the data that is common for a type of publication.
The Formats can be created, edited, deleted and used to create Title and Item/Piece records.
A default master Format can be defined. The default Format is the Format with the ID, "DEF". The default Format is used as a template to create additional formats. It contains data that is common to all formats.
The default Format is created, edited, and deleted the same as any other Format. Note, however, that the default Format cannot be used to create Title and Item/Piece records, as are normal formats.
Create a Format Record
The Retrieval Key field is set to retrieve by Format ID. The new Format ID and the appropriate fields for the Format are filled in. The Add Format function is then used to create a Format record.
Whenever a new Format ID is entered into the Retrieval field, the fields defined in the default Format (DEF) are automatically filled in. These values may be changed before the new Format is saved.
Update a Format Record
A Format record is retrieved by selecting the Format ID key and entering the Format ID to be edited. The fields are changed as required and the Update Format function is selected to update the record.
NOTE: Changing the default Format (DEF) does NOT cause corresponding changes in the format created based on the default Format.
Delete a Format Record
A Format record is retrieved as for an update. The Remove Format function is selected to delete the record. The operator is prompted to verify that the operation is desired.
Using a Format Record
When a Format is to be used to create a Title or Item record, the Format is retrieved by entering the Format ID in the Format screen field. (NOTE: the Format Field should not be confused with the Format ID Retrieval Key.) The fields on the screen can now be edited.
The information
may be placed into the open
1.3 Summary of Lot Services
Lots can be created (added) and updated by adding
Items. Lots are purged using the Purge
service in Window: File Maintenance: Purge. The service to be performed on the Items in a
Lot Record are (a) add a Lot Item record to the
Since Items are saved into
Add a Lot Item Record to a
The Add
Item function is used to add a title record to the
A Lot Item is created by:
Initial data entry
Using a Title or Item record as a template
Using a Format
Retrieving a Catalog System or AVIAC record
Explanations of these services are provided in the Summary of Title Record Services section.
Update a
The Update
Item function is used to modify existing Lot Item records. The desired
Item is called up to the screen, and the operator changes whatever fields need
to be changed. Selecting the Update
Item function causes the update to be saved in the
Delete a
The Remove
Item function is used to remove Lot Item records from the
1.4 Summary of Job Services (ABLE™ Bindery)
Jobs can be created (added) and updated with Piece records. They are purged using the Purge program in the File Maintenance program.
The service to be performed on the pieces in a Job Record are to (1) add a Job Piece record to the Job, (2) update a Job Piece record, (3) delete a Job Piece record from the Job. These services are similar to the Lot Services.
Add a Piece to a Job
The Add Item/Piece function is used to add a new Piece to a Job file. (Upon adding a new Piece, the font, font characters, spacing, placement and variable syntax are verified. If an error is detected, the Piece must be corrected prior to being added to the file.
When Lots are restored using the Library Bindery Transfer program, the Lot Items are placed into the HOLD Job. The HOLD Job is a special Job containing Lot Items that have not been assigned to Jobs.
Items in the HOLD
Job are placed into an actual Job by first specifying the Lot ID to be used (on
the
Update a Piece
The Update Item/Piece function is used to modify an existing Piece. The desired Piece is retrieved using the Job/Piece key and the operator changes whatever fields need to be changed. The Update Item/Piece function causes the update Piece to be saved in the Job file. (Upon saving the Piece, the font, font characters, spacing, placement and variable syntax are verified. If an error is detected, the Piece must be corrected.)
Delete a Piece
The Remove Item/Piece function is used to remove Piece from a Job file. The Piece to be deleted is retrieved and the Remove Item/Piece function is selected. The operator is then prompted to verify that the operation is desired. If so, the record is deleted from the Job file.
1.5 Title Screen Fields
The Title screen fields are summarized in this section.
(Note: that "Job" and "Piece" only apply to ABLETM Bindery.)
Key The retrieval keys are:
Title record Text, Title ID, Call, ISSN/ISBN, Private,
and Library barcode.
Job
record* Piece, Text, Call
Format
record Format
* (ABLETM
Bindery)
¬ ® Next
and Previous record buttons.
Format The form to be used as a template for creating new Titles/Items/Pieces. NOTE: the Format ID of DEF cannot be used since it is reserved for the master default Format – see below for an explanation.
Account The library account currently selected. If an Account is not selected then an error message is displayed indicating the Account ID must be selected.
Binder The binder currently selected.
Lot ID The
Item The currently active Item within
the
Vol Stat The current status of the volume:
(blank) created at library
proc processed by the bindery
hold not processed by the bindery
Job ID (ABLETM Bindery) The Job ID currently active (selected).
Piece (ABLETM Bindery) The currently active Piece within the Job.
Title ID The ABLE system assigned ID (Note: ABLE Bindery assigns numbers starting at 500,000 to avoid the same ID's at both the library and bindery.)
Call ID The Call Number Key of the volume. This is the retrieval key for searching by Call Number. It is derived from the Call Number entered in the Title Text area using the Call variable prompt. Refer to the Call Number section.
Priv ID The Private ID is a unique ID from another system (e.g. Catalog / Circulation System) or any other use the Library requires. The valid characters are any printable characters.
Library barcode The Library barcode is a unique ID from another system, set by
the ILS system. The valid barcode is composed of numeric plus with/without dash
characters.
ISSN The ISSN/ISBN standard serial or book number. The valid characters are any printable characters.
Dept The Department within the library for this volume (e.g. Math, Humanity). The Department may be restricted, on an account basis, to a confined set of Departments defined through File Maintenance. The field may be left blank. The valid values are selected from a pull down list if Departments are used.
Coll The Collection to which the volume belongs (e.g. permanent, rare books), to be entered manually.
Category The type of volume (e.g. serial, monograph). The valid values are selected from a pull down list. Examples include.
01 serial
02 monograph
03 pamphlet
04 newspaper
05 rush
06 patent
07 music
Bind Freq The expected period that the volume is sent for binding (e.g. weekly, monthly, etc.). It is used it is used in the Title Slip report to determine the number of binding slips to print. If the first characters are numbers then the number is used as the count of slips to print. E.g. 4 = 4 slips.
The valid values are selected from a pull down list. Specific values (upper or lower case) have designated printing counts.
|
Value |
Count |
Description |
|
Weekly |
52 |
Weekly |
|
Bi-Weekly |
26 |
Bi-weekly |
|
Monthly |
12 |
Monthly |
|
Bi-Monthly |
6 |
Bi-monthly |
|
Quarterly |
4 |
Quarterly |
|
Yearly |
1 |
Yearly |
|
1 – 999 |
1-999 |
Numerical Value |
|
|
1 |
No value in field (blank) |
Pub Freq The expected publication frequency. The valid values are selected from a pull down list. The values are,
|
Value |
Count |
Description |
|
Weekly |
52 |
Weekly |
|
Bi-Weekly |
26 |
Bi-weekly |
|
Monthly |
12 |
Monthly |
|
Bi-Monthly |
6 |
Bi-monthly |
|
Quarterly |
4 |
Quarterly |
|
Yearly |
1 |
Yearly |
|
1 – 999 |
1-999 |
Numerical Value |
|
|
1 |
No value in field (blank) |
Class the type of binding (e.g. custom, standard, etc.). The valid values are selected from a pull down list. Refer to the Class Field Rules section for a detailed description of this field. Examples include:
01 Standard
02 Economy
03 Paperback
Rules The automatic text fitting rules to apply to the Title Text panels. The rules are,
|
Rule |
Abbreviation |
Description |
|
Condense |
c |
Condense |
|
Vertical |
v |
Vertical |
|
Title Area Vertical |
a |
Title area vertical rule |
|
Title Panel Vertical |
p |
Title variable panel
vertical rule |
|
Front |
f |
Front-call |
|
Switch |
s |
Switch-call |
|
Title Area |
t |
Front-Title area |
|
Unique
Title Panel Variable |
u |
Front-Title variable |
|
Imprint |
i |
Front-Imprint. |
|
Call Panel Vertical |
l |
Call variable panel
vertical rule |
|
Imprint Panel Vertical |
m |
Imprint variable panel
vertical rule |
|
Substitute Pitch |
b |
Substitute pitch to bunch
lines closer together |
The rules may be defined in different places so they may be applied on a larger scale than just the Item/Piece record. There is a hierarchy of rules where the first level takes precedence over the higher levels.
|
Applied |
Description |
|
first |
Automatic rules in the item / piece |
|
second |
Automatic rules assigned to the Class value |
|
third |
Automatic rules in the Account Record |
The current automatic rules are displayed in this field using the above abbreviations, but when editing this field, the user is presented with a Rules dialog box. Here, they can manipulate the inclusion, exclusion, and order of specific automatic rules by their full name.
Copies Defines the number of copies (up to 999) for an Item/Piece. The default is 1. A blank is assumed to be 1. (Note: The field was labeled “Set Of” in v5.1.)
Spine The spine width (note that units requiring an integral and fractional part may be entered using a decimal notation; e.g., 8 and 4/8 in. may be entered as 8.4).
Height The spine height (note that units requiring an integral and fractional part may be entered using a decimal notation; e.g., 8 and 4/8 in. may be entered as 8.4).
Width The volume's width (note that units requiring an integral and fractional part may be entered using a decimal notation; e.g., 8 and 4/8 in. may be entered as 8.4).
Leaf The volume's leaf attachment method. The valid values are selected from a pull down list.
Extras The Extras/Specials for the volume. These values are the same ones entered on Collation screen and are placed on the Title Composition screen for easy reference.
Instructions The Instructions button opens a window for entering the following types of instructions:
Temporary Instructions for the current binding
Library Instructions from the Library to the Bindery
Bindery Instructions for Bindery use
Within the Instructions
window, the Apply button applies any
changes made immediately, the Close
button applies any changes made and closes the window, the Cancel button closes the window without applying any changes, and
the Help button invokes the online
help facility.
Also note that right mouse button menu items Cut, Copy, and Paste are availble in the Instructions window's text areas.
Fnt The Font for Title lines. The font code is verified by checking the account record definitions.
Spc The Spacing (pitch) between lines. The pitch code is verified by checking the account record definitions of valid pitch values.
Plc The Placement position of the line of embossable text (e.g. spine- centered, vertical). The placement code is first verified (e.g. C, V, F, etc.). It also must correspond to the font specified. See the Title Text Entry section for a detailed description.
Level The Level for each line on the volume--see the Title Text Entry section for a complete definition and for validation rules.
Cover The material to be used to cover the volume. The valid values are selected from a pull down list.
Print The foil color to use when embossing. The valid values are selected from a pull down list. The foil (print) colors are defined in File Maintenance by the binder.
1.6 Class Field Processing Description
The Class code is used to specify the type of binding. The valid classes are defined in File Maintenance. Each class is assigned a default:
·
Leaf
Attachment
·
Text
fitting rules (Rules)
·
Cover
Color
·
Print
(foil) Color
·
Trim
(top, bottom and front)
·
Extras/Specials
for the binding
1.6.1 Rules
When a Class is indicated for a Title or Item/Piece, the following rules apply:
Entering a Class Code
1. If the Class definition does not specify a Leaf Attachment, Rules, Cover Color, or Print Color (foil), the values in the Title or Item/Piece record for these fields are used.
2. If a Leaf Attachment, Rules, Print Color, Trim or Extras/Specials fields is specified in the Class record, the Class definition values for these fields are used, regardless if information previously existed for these fields in the Title or Item/Piece record.
3. If a Cover Color is specified in the Title or Item/Piece, the Cover Color in the Class will NOT override the existing Cover Color in the Title or Item/Piece.
Updating Class Related Fields in
Item/Pieces
1. When updating Class related fields (Leaf Attachment, Rules, Cover Color, or Print Color) in an Item/Piece record, the values for the fields entered by the operator are used.
Updating Class Related Fields in Titles
When updating Class related fields (Leaf Attachment, Rules, Cover Color, or Print Color) in a Title record:
1. If the Class does not specify a value for the related field being updated, then the operator's input values are saved.
2. If the Class definition specifies a value for the field being updated, the operator's input are ignored.
3. EXCEPTION: The Cover Color defined in the Class will NOT override the Cover Color entered by the operator.
4. EXCEPTION: The values for the Trim and Extra/Specials fields are always assigned from the Class definition.
Updating a Class Definition Record
When updating the Class definition record:
1. Updates to Class related fields in the Class definition do not effect existing Item/Piece records specifying that class.
2. Updates to Class related fields in the Class definition are reflected in the Title record and follow the rules indicated for adding a Class to a Title.
1.6.2 No Touch Class (ABLE Bindery)
Not all pieces in a Job need to be Measured, Text Fit or Released. For instance, if a volume only needs to have a page added, there is no need to Measure or Text Tit it. However, ABLETM must keep track of the volume for billing purposes.
A "No Touch" class is used to specify this special volume. Pieces with this class are neither Measured nor Text Fit. They are skipped during the Release and Embossing processes. However, they are included in the Lot Billing Statistics.
2. Record Retrieval
Record retrieval is the means of
calling back an existing Title, Format or Lot-Item record to the screen. For ABLETM Bindery there is also a Job-Piece retrieval for
Pieces in a Job. The records retrieved
can then be edited (updated), used as a basis for adding a new record, removed
(deleted), or selected for a
Selection may be made based on any of the following "keys". The key type is used to retrieve the record from the appropriate file. The selections are:
|
Retrieval Record |
Keys |
|
Title |
Title ID |
|
|
Text |
|
|
Call Number |
|
|
Private ID |
|
|
ISSN/ISBN |
|
|
Library barcode |
|
|
|
|
Format |
Format ID |
|
|
|
|
Item |
Item Number |
|
|
Text |
|
|
Call Number |
|
|
Library barcode |
|
|
|
|
Pieces (ABLETM Bindery) |
Piece Number |
|
|
Text |
|
|
Call Number |
The Retrieval Key is selected by viewing the list box for the Key field.. The operator then selects one of the retrieval keys.
Note: If an Account has not been previously selected, then an error message is displayed indicating the Account ID must be selected.
The requested record is displayed for the Account specified. If there is not an exact match for the identification entered, then the record Search rules are applied. See the Search section below.
Subsequent records are retrieved by one of the following actions:
|
Action Button |
Description |
|
® or F4 |
retrieve the next sequential record |
|
¬ or Ctrl-F4 |
retrieve the previous record for the key. |
|
CLEAR or F3 |
the screen fields are cleared (except for the
Account, Binder, and |
2.1 Title Record Retrieval
2.1.1 Text Key
The Text key selection allows retrieval of Titles, Items and Pieces records. The key uses text of the Title to form the Text key.
2.1.1.1 Text Key Creation Rules
(a) The general rules for the forming the key is,
first two letters of the first four words of the Title
The key is at least 1 and not more than 8 characters.
(b) The letters selected are restricted to alphanumeric (A to Z, 0 to 9, a to z). All others are ignored.
(c) Titles with less than four valid text key words will have a text key less than 8 characters.
(d) Any Title word in the exclusion list is ignored. (The exclusion list is defined using the File Maintenance program.). For each ignored word, the next word is tried.
(e) Words are ended by any line break or space characters, either implied or specific.
(f) Hard hyphens and soft hyphens are ignored.
(g) Single character words are used in generating the text key when the Global System Parameters setting “Single Letter Text Key” is selected.
Examples of Text keys follow. For the examples, the word "of" is in the exclusion list and '=' is the soft hyphen.
|
TITLE |
TEXT KEY |
RULES |
|
Abnormal Psychology of |
ABPSAM |
(a,c) |
|
Abnormal Psychology |
ABPS |
(a,c) |
|
Life of a Poet |
LIPO |
(c,d,e) |
|
N. A. Indians |
IN |
(c,b,d) |
|
N-A Industries |
NAIN |
(c,g) |
|
N- A Industries |
IN |
(c,d,f,g) |
|
N - A Industries |
IN |
(c,d,g) |
|
N-|A Industries |
IN |
(c,f,g) |
|
Abnormal Psych-|ology |
ABPSOL |
(a,c,f) |
|
Abnormal Psych= (level 25) ology (level 24) |
ABPSOL |
(c,f) |
|
ABC|BOOK = BINDING |
ABBOBI |
(c,f.g) |
|
ABC|BOOK=BINDING |
ABBO |
(c,f) |
|
ABC|BOOK=|BINDING |
ABBOBI |
(c,f) |
|
ABC|BOOK - BINDING |
ABBOBI |
(c,f,g) |
|
ABC|BOOK-BINDING |
ABBO |
(c,f) |
|
ABC|BOOK-|BINDING |
ABBOBI |
(c,f) |
2.1.2.1 Changing the Exclusion Rules
The "exclusion" list is modifiable. The File Maintenance program is used to add and modify words in the list. Words on this list (e.g.: "the") are ignored when forming the key.
2.1.2 Call Number Key
The Call key selection allows retrieval of Titles based on the first 15 characters of the call number. The Call Number is embedded in the Title text and is located by the program via the "CALL" variable name.
The Call Number is constructed using the data characters after the Call variable, eliminating the CALL exclusion words. The valid characters for the Call Number are alphanumeric, '.', and special characters that can be printed.
The Call Number Key is constructed using the characters of the Call Number and applying the Call Number Key creation rules. (See the System Parameters section in the Utilities volume.) The special character Call Number Key creation rules are:
|
System Defined Character |
Call Key Character |
|
Space |
Omitted |
|
Required Space |
Omitted |
|
Wide Space |
Omitted |
|
Line Break (Horizontal and Vertical) |
Omitted |
|
\ |
Omitted |
|
Soft Hyphen |
Hard Hyphen (see Hyphens section) |
Note: there are no spaces in the call key.
Comments are excluded from the call key.
The Call Number is determined using excluded words for Call Numbers. The rules are similar to excluded Text key words. The Call exclusions are defined using the File Maintenance program.
Whenever a Call Number Key needs to be created, the excluded data base record words are used to match the "words" of the Call Number. If there is a match, the word will not be part of the Call Number Key.
Notes: (1) the excluded word will be used for billing.
(2) words are excluded, not text characters. “Words” are text characters separated by spaces at both ends.
Examples of Call Numbers and the associated Call Number Keys follow.
Note: Bold words indicate a variable name. The word "PER" is a Call Number Key exclusion word for these examples.
|
Call Number |
Call Number Key |
|
CALL R\Z7164.C156 |
RZ7164.C156 |
|
CALL W12\321\monthDEC |
W12321 |
|
Call R\+\A123.W21 |
R+A123.W21 |
|
CALL R\Z7 PER C156 |
RZ7C156 |
Note: The month variable is not included in the Call Number Key.
The rules to recognize the end of a Call Number are:
The end of Title text – there are no more title lines
The next variable label is a recognized label (Title, imprint, and call)
Note: Font, level, pitch and spacing changes will not end a Call Number.
The Call Number variable name is defined as a variable name of either "c", "call, "$c", "$call", <no panel break character>c, <no panel break character>call. Examples follow (note the examples assume the <no panel break character> to be " "),
CALL, C,
$c, Call, $call,
c
Variable names are defined in the Title Text Area by selecting Variable entry displayed using the right mouse button while the cursor is on the spot where the variable prompt should be placed.
If an incomplete Call Number Key is specified, ABLETM automatically displays all records matching the entered Call Number characters. This technique can be used to search the database when the complete Call Number is not known.
2.2.3 Private ID Key
The Private ID key is a general-purpose record key for use by the library for special requirements. For example, the Private ID field allows the library to specify a key that may be used by their Catalog system. The valid characters for the Private ID are alphanumeric and special characters that can be printed.
2.1.4 ISSN/ISBN Key
The ISSN/ISBN key allows the retrieval of Titles by the standard serial or book number. This key field may also be used to contain Private ID values if so desired by the library. The valid characters for the ISSN/ISBN are alphanumeric and special characters that can be printed.
2.1.5 Title ID Key
The Title ID key allows retrieval of Titles by the identifier assigned by the ABLE Library system. This identifier is unique throughout all Titles for a library account. Note: if you notice a Title ID that is very high (500,000+), the title was created by the Bindery. The range above 500,000 is reserved for bindery use since this avoids duplicate Title records.
2.1.6 Title library barcode key
The title library barcode key
allows retrieval of Titles by the barcode assigned by the ILS system. This feature is available only for ABLETM 6.4 or
higher.
2.2 Format Record Retrieval
The Format ID key allows retrieval of Format records for editing, creating and deleting of the formats. Formats are templates for assisting in Title data entry. The Format ID key is comprised of alphanumeric characters and any printable characters.
When creating a new Title record, first enter the Format ID in the Format field of the Title Composition screen. This will cause the retrieval of the corresponding Format record. The remaining Title fields can then be entered.
There is a master default Format defined, called DEF. The default Format is used as a template for creating other Formats. It contains the data that is common to all formats.
2.3 Item and Piece Record Retrieval
The Item Number keys allows Items in a Lot Item file to retrieved by different keys.
The Piece retrieval keys are for ABLETM Bindery. These keys allow records to be retrieved by Job ID and Piece ID/
Note: For ABLETM Bindery refer to the Job Services section for an explanation of retrieving Lot Items from the HOLD Job.
The Item and Piece retrieval keys provide different methods of retrieving the same physical Lot Item record. The physical record has two methods of identification: Lot-Item and Job-Piece. The Item/Piece retrieval keys and their context are summarized as follows:
2.3.1 Item Text Key
The Item Text key allows an Item to be retrieved using the Text key (see the Title Retrieval section for Text Key.
2.3.2 Item Call ID Key
The Item Call key allows Items to be retrieved using the Call ID Key. Refer to the Title Retrieval section for Call ID.
2.2.3 Piece Text Key
The Piece Text key allows Pieces to be retrieved using the Text key (see the Title Retrieval section for Text Key.
2.2.4 Piece Call ID Key
The Piece Call ID key allows Pieces to be retrieved using the Call ID key (see the Title Retrieval section for Call ID Key.
2.2.5 Item library barcodeKey
The piece library barcode key allows retrieval of pieces/items by the barcode assigned by the ILS system. This feature is available only for ABLETM 6.4 or higher.
2.4 Catalog Systems
Library Catalog/Circulation
system titles as MARC records are retrieved and processed using the ABLETM Catalog System
(Z-Link) service. See the Z-Link Reference
Guide for documentation on this feature.
AVIAC records are retrieved and
processed using the ABLETM Import (A-Link) service. See the A-Link Reference Guide for documentation on this
feature.
2.5 Search
For those keys where Search is allowed (all fields except numeric fields:
Title No, Item No., Job No.), when there is no exact match of the associated
record key, a search is automatically invoked and results are displayed. To invoke Search, the Setup:
User Parameters: Enable List Search must be set.
The searching of multiple Lots is enabled using the Setup: User Parameters: Search All Lots. All Lots are then searched for the specified record when searching by Text or Call Number Keys. (Note that list search must also be enabled.)
For numeric keys, when there
is no exact match, a message stating "record not found" is
displayed. Then the Next or Previous
keys will get the next record with the closest value.
A screen is displayed with the matching records in alphabetical order. The cursor keys and Page-Up (PgUp) and Page-down (PgDn) keys can be used to change the focus to a specific record. Upon double-clicking the record, it is retrieved.
The following rules apply:
(a) If the retrieval key is blank (spaces), then an error
is displayed since at least one character is required.
(b) The user defined required space character can be used
if a trailing space is to be part of the retrieval key. For example, "CO" is different than
"CO " when the space following the CO is a required space character).
(c)
If no records are
found, an error message is displayed.
(d)
If one record is
found, the record is retrieved and displayed.
(e) If multiple records are found, the following
information is displayed for each Title: Title text, Department, Collection,
and Retrieval Key. For example, if the
search was for the CALL key, the Retrieval Key is the Call key.
3. Title Text Entry
The Title text for a record is typed in a free form manner, with ABLETM fitting the text to the spine according to automatic text fit rules. When the spine measurements are added at the bindery, ABLETM Bindery performs the final text fitting before embossing.
Each line of the Title text area comprises 5 different areas,
Fnt font identifier
Spc line spacing
Plc text placement (e.g. center, left, right)
Lvl height on the volume
(Title Text) text to emboss and comments
A setting for any of the first four fields (characteristics) is effective on the line that it first appears, and remains in effect for all following lines until a different value is given.
3.1 Line Breaks
Line breaks (new lines) are specified as follows:
\ (Backslash) System-wide horizontal line break character
User-defined horizontal line break character (e.g. "|") defined in the System Parameters
User-defined vertical line break character defined in the System Parameters
Change in level
For vertical placement: the same level and placement causes a line break
For vertical placements, new horizontal lines (i.e. '\' or the user defined new-line) are processed as spaces within text that is being placed vertically.
A new vertical line starts at the beginning of any line in the ABLETM text area that contains a level. If there is no level, the text is considered a continuation of the text on the previous line in the text area.
The user specified new vertical line character, (Vertical Break Character defined in the Systems Parameters), starts a new vertical line with the same level as the previous vertical line. This is processed the same way as using a separate text line on the text screen with the same vertical placement and level as the previous text line. Multiple vertical line breaks are not condensed to one line break for the GEM and System 3 embossers.
For horizontal placement, line breaks represent the user defined number of levels; i.e., they are processed the same way as using a level number Number of Levels per Line Break (defined in the System Parameters) below the current level.
3.2 Level Entry and Validation
Levels may be specified as a numeric value or height table code. There must be a level specified for the Title text. The validation is done whenever a Title/Item/Piece is created or updated.
If a numeric level is specified, the bindery uses this level to emboss the text.
If a height table code is entered, the bindery uses a height table to determine the proper level after the spine height is determined. The height table names may be any one to three letter combination of W, X, Y or Z. When a height table code is used it is validated to ensure that the associated placement matches the intended use of the height table code.
Refer to the System Parameters Guide for instructions on constructing the height tables.
.
3.3 Fonts and Font Character Validation
The font and font characters are validated when a volume is created or updated (e.g. add Item, update Title, etc.). The valid font numbers are those defined in the specific Account record. Each font requires an associated font record. The font characters are validated by checking them against the characters defined in the font record for the specified font.
3.4 Subscript, Superscript and Font Substitution
When subscripts or superscripts are used, the subscript or superscript font must be defined in the original font record.
For the RB7/11, if the subscript or superscript is not defined in the original font record, ABLETM uses the subscript or superscript defined for the substitution font record. The substitution font is defined in the font record. This feature compensates for the RB7/11 problems where a font can only have a subscript or superscript font associated with it, but not both. See the ABLETM System Parameter Document.
The characters in the subscript or superscript font are also verified. Example: a superscript of "12" is specified for font 3. The system verifies that a superscript font can be accessed from font 3. The system also verifies that "1" and "2" are valid superscript characters.
Note: ABLETM assumes that the original font and the substitution font are identical with the exception that one specifies a superscript font and the other, a subscript font.
3.5 Automatic Placement
When a font is entered, the placement is automatically displayed to correspond to the font. When the user changes the font from horizontal to vertical or vertical to horizontal, the placement also changes to correspond to the new font type. The user can overwrite the placement if necessary.
The placement to use for a specific font type (i.e. horizontal, vertical, both) is defined as follows:
- Horizontal Font Type
The default horizontal placement (the Default Horizontal Placement system parameter defines the default horizontal placement).
- Vertical Font Type
A "V" is used for vertical fonts.
- Both Horizontal/Vertical Font Type
The default horizontal placement (the Default Horizontal Placement system parameter) is used if the font is the first one entered by the operator. Font entries, when there is already a font entered on a line above this new entry, will display the placement for the font previously entered. This is done since the placement can not be determined from the font type.
3.6 Placement Verification
The valid placements are:
Horizontal Placements
|
Code |
Description |
Comment |
|
C |
Center text |
|
|
L |
Left justify (Straight left margin) |
Centers the longest line in the panel and all others are left justified to the longest line. |
|
R |
Right justify (Straight right margin) |
For v3.2, centers longest line in panel and all others are right justified to the longest line |
|
1 |
Right justify |
fixed 1/4 inch from left margin; not valid for System 3 |
|
F |
Front cover, left justified, left side |
|
|
AC |
Front cover, center justified, left side |
System 3 only |
|
AR |
Front cover, right justified, left side |
System 3 only |
|
NC |
Front cover, center justified, right side |
System 3 only |
|
NL |
Front cover, left justified, right side |
System 3 only |
|
NR |
Front cover, right justified, right side |
System 3 only |
|
H |
Front cover, center justified, center |
System 3 only |
|
FL |
Front cover, left justified, center |
System 3 only |
|
FR |
Front cover, right justified, center |
System 3 only |
|
PC |
Back cover, center justified, left side |
System 3 only |
|
PL |
Back cover, left justified, left side |
System 3 only |
|
PR |
Back cover, right justified, left side |
System 3 only |
|
BC |
Back cover, center justified, right side |
System 3 only |
|
BL |
Back cover, left justified, right side |
System 3 only |
|
B |
Back cover, right justified, right side |
System 3 only |
Vertical Placements
|
Code |
Description |
Comment |
|
V |
Vertical |
See note. |
|
3 |
Vertical (Alternate vertical) |
|
|
U |
Up the Spine |
System 3 only |
|
6 |
Alternate Up the Spine |
System 3 only |
Note: All of the vertical placements have expanded meanings.
Allow Top-Aligned Multiple Verticals in the System Parameters is asserted.
the embosser type is not System II
the vertical is a multiple line vertical.
If all of the following criteria are true, a placement of "V" causes the multiple line vertical to be centered around the longest vertical line, and a placement of "3" causes all of the lines of the multiple line vertical to be placed starting at the same level.
The placement must correspond to the font specified; e.g. horizontal fonts can only be used with horizontal placements. The font record contains the type of font definition (horizontal, vertical, both). Refer to the Automatic Placement section.
3.6.1 Ending Level Number
Any of the one character horizontal or vertical placement codes may contain an “E” in front of it. This specifies that the text should end, and not start, and the specified level number.
3.7 Spacing Validation
Pitch is the spacing between embossing levels. The pitch code is in the range 00 to 99, allowing up to 100 different pitches to be defined. The letter represents the actual pitch value. Only certain values are valid for a specific library. The spacing (pitch) values are verified against the Account record pitch codes for the library.
The height on the spine to emboss text is determined by multiplying the pitch by the level;
Text Height =
Pitch x Level
The system supports the following pitches.
|
Code |
Value |
Comments |
|
1PI |
1 Pica |
|
|
2PI |
2 Picas |
|
|
2PA |
2 Picas Adjusted |
(ACME; 222 clunks) |
|
SIC |
Special |
(LEHMANN; 291 clunks) |
|
.5P |
Half Picas |
|
|
.5M |
Half Millimeters |
(For use with GEM embossers only) |
|
1MM |
Millimeters |
|
|
2MM |
Double millimeters |
|
|
1/8 |
Eighth of an inch |
|
|
1/4 |
Quarter of an inch |
|
|
3/8 |
Three eighths of an inch |
|
|
1/2 |
One half of an inch |
|
|
5/8 |
Five eighths of an inch |
|
|
116 |
One sixteenth of an inch |
|
|
316 |
Three sixteenths of an inch |
|
|
516 |
Five sixteenths of an inch |
|
|
716 |
Seven sixteenths of an inch |
|
3.8 Hyphens
There are two types of hyphens: a hard and soft hyphen. The hard hyphen is the normal hyphen character (-) and has the characteristics of normal hyphens for breaking words between lines when necessary for text fitting purposes.
Soft hyphens are used for vertical text placement. Soft hyphens are automatically removed when horizontal embossable text is automatically set vertical (see the Text Fitting Rules section). When text to be placed vertically, the leading and trailing spaces surrounding hard hyphens are eliminated.
The soft hyphen character is defined in the system parameters. (see the System Parameters volume). An example of a typical soft hyphen character is the equal sign (=).
3.9 Spine Boundary Limit Checking
There are two types of spine boundary limit checks automatically performed:
Title variable with specified limits
Text not within the lower spine reserved area
The Title data is checked to be within specified levels on the spine. This avoids Title to be embossed too close to or too far from the top of the spine. The checking is based on ranges of levels depending on the spine height measurement.
Vertical and Horizontal Limit tables are used to indicate a valid range of levels in which a Title may begin on the spine. Different ranges may be entered into the table based on the height of the volume. Refer to the System Parameters volume for details on setting up these tables.
The Account record must contain the names of the Vertical and Horizontal Limit tables. If the names are not defined, then the checking is bypassed. Note: the checking is bypassed even if the tables are defined in the database.
A warning is displayed if the Title limits are exceeded. The user would then be able to correct the problem or accept the text fit as is.
Note: Text fitting is performed when the Fit or Cover Image function is invoked, when ABLETM Bindery automatic fitting is selected during Measurement, and during ABLETM Bindery Release processing.
3.10 Automatic Text Fitting Rules
When title text does not fit within the area available, it is necessary to manipulate the text to make it fit. ABLETM provides for automatically applying some rules without user intervention.
The different text areas of a title are called panels. The definition of a panel is complicated but generally starts and ends when a Level is specified or when a variable is specified. Refer to the Text Fit Style Guide volume for details.
ABLETM automatically reformats the title text for a panel by using the Text fitting rules. The automatic rules to be used and the order in which they are to be used are specified in Rules field of the title.
Note
Refer to the ABLETM Text Fit Style Guide (volume 5 of this Functional Specification) for detailed explanations of the Text Fitting Services.
The (abbreviated) rules are summarized as follows:
C Condense to a smaller font
V Switch to vertical
A Switch to vertical if in title area
P Switch to vertical if in title variable panel
S Place call area on the front cover in upper left hand corner
I Place imprint area on the front cover
L Place Call Panel Vertical
M Place Imprint Panel Vertical
W Vertical Line Wrap
X Omit Call Number
O Operator Intervention
J Jump
Up/Down (move panel up or down)
1. Condense (C)
If text that is to be placed horizontally does not fit horizontally, and the condense rule has been specified, then the condense rule is used. This rule causes ABLE to try to use the condensed font assigned to the requested font. If one exists, it becomes the current font, and is tried. This continues until the current font has no condensed font.
2. Vertical (V)
This rule switches to the vertical font group when attempting to reduce overset areas. The Vertical rule is often the last attempt to fit text. Vertical fonts can be condensed if more than one vertical font is available by having one font indicate that the "condensed vertical" font is a chained vertical font. All multiple line verticals created by this and other vertical rules are centered on the longest line in the set.
3. Title Area Vertical Rule (A)
This rule is a subset of the Vertical rule. The Vertical rule is applied only if the boundary error occurred in the Title text area; i.e., not part of the Call or Imprint panel.
4. Title Panel Vertical Rule (P)
This rule is a subset of the Vertical rule. The Vertical rule is applied only if the boundary error occurred in the explicitly or implicitly defined Title variable panel.
5. Front Rule (F)
This rule places the Call lines on the front cover. The level of the call lines remains the same. Note: The feature is not applied if any segment in the call area has a vertical placement.
6. Switch Rule (S)
This rule places the Call lines on the front cover. The level of the call panel is assigned the Title panel's level. If no Title panel exists, the Switch rule acts the same as the Front rule. NOTE: The rule will not be applied if any segment in the call area has a vertical placement.
7. Unique Title Panel Variable Rule (U)
This rule places the Title panel variable text lines on the front cover.
8. Title Area Rule (T)
This rule places the Title area text lines (all lines except Call and Imprint lines) on the front cover. NOTE: The rule is not applied if any segment in the Title area has a vertical placement.
9. Imprint Rule (I)
This rule places the Imprint lines on the front cover. NOTE: The rule is not applied if any segment in the Imprint area has a vertical placement.
10. Call Panel Vertical Rule (L)
This rule is a subset of the vertical rule. The vertical rule is applied only if the boundary error occurred in the explicitly or implicitly defined Call panel.
11. Imprint Panel Vertical Rule (M)
This rule is a subset of the vertical rule. The vertical rule is applied only if the boundary error occurred in the explicitly or implicitly defined Imprint panel.
12.
Substitute
Pitch Rule (B)
A Bunch (B) rule change pitch to move lines closer together. The starting level of the panel and all subsequent panels remain unchanged. The pitch is substituted for the next pitch until the panel text fits successfully.
The rule changes (substitutes) the pitch used to text fit a panel based upon the pitch table in the Account record. The order of the pitch codes in the Account Pitch table specifies the order of substitution; top down, left column then right column.
Notes: (1) the Account record Pitch table has two uses:
(a) to validate pitch values, and
(b) to provide the order for pitch substitution.
(2) The rule applies to all embosser types.
(3) The Update utility can be used to reorder the pitch table. Refer to the Utility volume
13.
Vertical
Line Wrap (W)
The vertical line wrap rule (W) is used when a panel is changed from horizontal vertical. If the Global System Parameter “Line Wrap %” is set, it used to determine relative lengths of vertical lines. Vertical lines are determined by dividing the title text so that the first line is longer and in proportion to the remaining vertical lines.
For example, if this parameter is set to 50 (percent), then text fit will try to make subsequent vertical lines half as long as the longest line. Setting this parameter to 0 defaults to the normal behavior of vertical lines.
If this rule is followed by the Operator intervention rule, the operator can view what the vertical line wrap did.
14.
Omit Call
Number (X)
The omit call rule (X) is used to omit the Call number panel from stamping if it does not fit on the spine after all previous rules are attempted. The Call number is not charged as a billable item.
15.
Operator
Intervention (O)
The operator intervention rule (O) is used to stop the text fitting process if all previous rules have failed or if the previous rule was Vertical Line Wrap (W). The operator then has two choices at this point:
Make Changes and restart rules
Continue with next rule
If the operator chooses to restart the rules, the operator intervention rule is executed again. If the operator chooses to continue, text fitting starts with the rule after the operator intervention rule.
16.
Jump Up/Down
(J)
The Jump/Up Down rule (J) is used in cases
where two panels overlap. Using this
rule, a panel is either moved up or down until a successful fit or until the
limits specified in a limit table or spine boundary are reached. This rule is most useful when a vertical
panel overlaps a horizontal panel.
3.11 Title Text Composing Services
There are many services that provide for composing Title text. The services are grouped by how they are primarily invoked:
Right Mouse Button / Function Keys
Keyboard Editing Services
Menu Edit Services
3.11.1 Right Mouse Button
A menu of editing services is displayed after selecting the right mouse button while the cursor is in the Title Text Area. The services are as follows:
This selection returns the text entry mode to normal text. It is used to reverse the following text modes: superscript, subscript, variable, comment, or accent.
Superscript (Alt-F9)
The Superscript selection is used during entry of the Title text to indicate superscript text. Text typed in this field is embossed using a superscript font, with the level altered according to the superscript font specification. The superscript text is displayed above the text line.
Note: (1) Only valid superscript characters may be selected.
(2) For the RB7/11, superscripts and subscripts are not allowed in the same segment or text line.
Subscript
(F9)
Same as Superscript except that the subscript characters are displayed below the text line.
Accent (Alt-F7)
The Accent selection is used during text entry indicates that an accent is to be selected. The valid characters are displayed and the user selects the one required. Accent characters are displayed as they look when embossed. For special characters (e.g. combination of font characters), a special character appears to represent the combination.
For the accent to be properly embossed, it must be properly defined in the ABLETM font with the accent character selected.
Note: (1) ABLETM assumes that all fonts in a given library or bindery are set up so that if a character represents an accent in one font, it must represent the same accent in all fonts. If this rule is not followed, then text fitting may produce invalid results.
(2) ABLETM ignores whatever portion of the accent is above the height of a given font. This means that if an accent is used on lines that are close together, the top of the accent may be embossed on top of part of the text of the line above it with no boundary errors being reported by ABLETM.
Comment (Alt-F8)
The Comment selection to indicate a comment. A comment is stored with the Title text and displayed using a color. Comments do not affect the lettering of the volume and do not appear on the binding slips.
The Variable selection indicates that highlighted text is a variable (e.g. PAGES, MOS, CALL). The Variable indicates special text that is processed with special considerations. The contents of a variable field may also change every time a periodical is bound.
A Variable consists of the variable name and the associated variable text. The Variable name is displayed in a special color. The Variable Data follows this field. The Variable ends a number of different ways: (a) another variable follows, (b) it’s last variable on the screen.
The variable fields are tracked by the system to provide a binding history.
There are three special variable fields:
Title
Call Number
Imprint
These special variables identify fields needed for defining panel breaks and for ABLETM Bindery billing purposes (see the Reports volume for details about the ABLETM Bindery Lot Billing report).
The format of the Variable Name is case insensitive (e.g. CALL, Call, and call are identical). The name identified for Call, Title and Imprint are:
|
CALL |
TITLE |
IMPRINT |
Comment |
|
call |
Title |
imp |
|
|
c |
t |
i |
|
|
#call |
#Title |
#imp |
# indicates there is no panel break (refer to the Style Guide volume). |
|
#c |
#t |
#i |
# indicates there is no panel break (refer to the Style Guide volume). |
Note that ‘#’ in the table above represents the ‘no panel break’ character (No Panel Break Character in System Parameters), and could be defined as a character other than ‘#’ (e.g., ‘!’).
Foil (System 3 Embosser Only) (F11)
Volumes can be blocked using one or more foil colors.
ABLE implements foil changes with a new text field prompt, called Foil Color Change. The foil color for the characters following the prompt are embossed with the foil color code within the prompt. Multiple foil changes can be specified. For example, if the Call Number (Class Mark) is to be in white, the Foil Color Change must precede the Call data and be on the same line.
A foil color
change will be in affect until the next foil color change.
In the following example, the prompt is n(xxxx)n, where xxxx is the foil color.
|
Example, n(whit)nn<call>n123-45\ABCD\ n<vol>nXII n(gold)n1993 or n<call>nn(whit)n123-45\ABCD\ n<vol>nXII n(gold)n1993 |
The CALL number and the "XII" of the volume will be blocked with the whit foil color and "1993" with gold.
Note that the Codes Foil parameters
for System 3 do not use the Dwell and Spool fields. No Changes are needed to check for this.
Change Font (Alt-F11)
The Change Font selection allows a single stamped line to contain
multiple font changes while preserving the font/panel relationship. After selecting “Change Font”, type in the
ABLEä font id to
change to, then press F5 (
The “Change Font” only applies to the line containing the font change and
not the entire panel. If any rules are
used that change the font, the font change on the line is ignored.
Copy, Cut & Paste
These services are the standard Windows Cut, Copy and Paste services. Text may Cut, Copy and Pasted within ABLETM and between ABLETM and other programs supporting standard Cut, Copy and Paste.
Undo and Redo
These services are the standard Windows Undo and Redo services. They are only available in the text area.
Cover Image
See Cover Image.
3.11.2 Keyboard Editing Services
The Title Text editing related keys are described as follow:
Tab Key
The Tab keys are optimized for changing between Variables. The TAB key is used to move from one variable field area to another. The Tab key moves forward and the shift-Tab key moves the cursor backwards. The cursor moves to the first character past the next variable field.
Once in the Title Text area, Tab does not allow the cursor outside of the Title text area. A Tab from the last variable field places the cursor after the first variable field.
Cursor Keys
The cursor keys cause the cursor to move in the direction specified (provided text, even spaces or carriage returns, exist in that direction).
Enter Key
The Enter key causes the cursor to be placed in the first column of the next line
The entry of text is performed in "word-processor" mode. This means that many of the time saving features found in word processors are available during entry of the Title text. These features are:
|
Edit Key |
Description |
|
Backspace |
Delete the character in behind the cursor. |
|
Delete |
Delete the character in front of the cursor. |
|
Home |
Move to first character of the first word on the text line. |
|
End |
Move to last character in text line. |
|
Insert |
Toggle Insert mode or Overstrike mode. |
|
Cursor Up, Down |
Move up/down one line. |
|
Cursor Left, Right |
Move left/right one character. |
|
Ctrl-Home |
Move to first character of the first word on the first line. |
|
Ctrl-End |
Move to the last character of the last word on the last line. |
Horizontal Line Scroll
The user may enter Title text past the end of the display area. The line automatically moves left to leave room to type. When viewed, a horizontal scroll bar appears, indicating that is there is text just off the screen. This text is displayed by moving the cursor past the end of the line.
Note: For UBS printing, a best attempt is made to fit long lines onto the slip.
Vertical Scroll
The Title Text area can also be scrolled when there are too many lines to for the display area. A scroll bar is displayed to indicate that there are lines off the bottom of the Title Text area.
3.12 General Field Editing Key
These services may be used for any text entry field. (For the Title Text area editing refer to the General Title Text Editing section.)
3.12.1 Field Editing Keys
The field editing features are:
|
Editing
Key |
Description |
|
Backspace |
Delete the character in behind the cursor. |
|
Home |
Move to first character of the first word on the text line. |
|
End |
Move to last character in text line. |
|
Delete |
Delete the character in front of the cursor. |
|
Cursor Left, Right |
Move left/right one character. |
3.12.2 Field Editing Services
Additional features of ABLETM that make the entry of Title data efficient are:
Compose
& Compose Plus (Compose+)
Cut,
Copy & Paste
Default
Values for Fields
List
Boxes
Compose
& Compose +
The Compose mode causes all of the screen fields to be cleared after a Title has been added to the database. The Compose+ mode does not clear the screen fields. A new Title can then be composed using the data from the previous Title record.
The Compose mode is the default mode. The operator can change the mode by changing a Setup: User Parameters (see the Workstation Parameters section).
Copy, Cut & Paste
These services are the standard Windows Cut, Copy and Paste services. Text may Cut, Copy and Pasted within ABLETM and between ABLETM and other programs supporting standard Cut, Copy and Paste.
Default
Values for Fields
There are many features for automatically entering field data. The features include:
Formats Refer to the Format Key section.
Account Data there are default fields in the Account record that automatically causes Title fields to be entered.
Class there are default fields for the Class selected that cause Title fields to be entered. Refer to the Class section.
Font when a font is selected, the associated placement is entered.
List
Boxes
Most fields that require valid data have a pull down list from which the valid data can be selected. Example are: Class and Leaf Attachment.
4. Main Screen and Title Services
The Main screen provides,
Title screen Title services are accessed using the menu bar services.
Control screen Other services, such as Reports, are accessed from this screen.
Note: The services are “grayed” if they are not applicable to the current mode of operation or the user does not have access to the services.
Figure 2 shows the layout of the Title Screen.
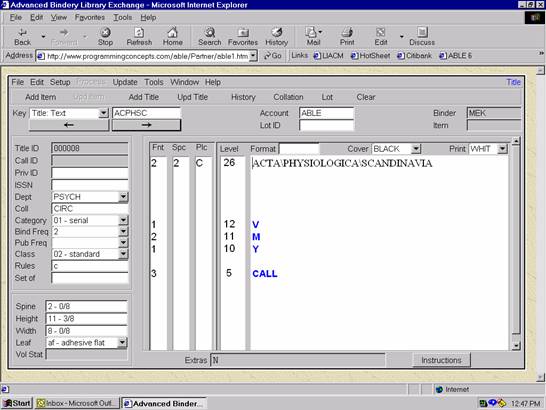
There are two rows of menu services:
Top Row Menu Selections
Second Row Shortcut Buttons
The services are listed below. Additional descriptions follow the list for the items marked “(See Below or Notes)”.
Note: The items with keyboard shortcuts are indicated in square brackets […].
Menu Selections:
File Log
out of ABLE
Edit Cut,
Paste & Copy
Setup System & User Parameters
Print UBS
Printing Options
Process Bindery Transfer Services
Update Add,
Change, & Delete Records
Tools Job
Release and Emboss Services [Bindery Only]
Window Select
ABLE services
Help User
help documents
4.1 File
Log Out Logoff of ABLETM and return to the Logon screen.
4.2 Edit
Cut [ Ctl X ] Cut
Copy [ Ctl C ] Copy
Paste [ Ctl V ] Paste
4.3 Setup
There are two types of Setup parameters:
User Parameters User parameters that are used whenever the user logs onto a workstation.
System Parameters Parameters that are used on all workstations within the library or bindery.
4.3.1 User Parameters
Search All Lots Sets Global Lot Search mode. All Lots are searched for the record.
Global Lot/Job Search [Bindery Only] Set Global Lot Search mode. Same as Search All Lots except includes Jobs.
Enable List Search Allows the search mode to be used on all queries (see the Search section).
Enable A-Link Allows access to Import (A-Link) services.
Enable Z-Link Allows access to Catalog System (Z-Link) services.
Auto Calculate [Bindery Only] Allows Automatic Calculation during Release. If checked, this option automatically calculates a piece's measurements during the release process.
Assign Lot to Job [Bindery Only] If this option is checked during the Restore process, all lots are restored to a single Job, bypassing the HOLD job.
Move Deleted Piece to HOLD Job [Bindery Only] If checked, move a piece back into the HOLD job instead of physically deleting it.
Auto Piece Select [Bindery Only] Manual or automatic Piece Number selection. Manual selection allows the operator to assign unique Piece numbers as Pieces are added to the Job. The Automatic selection allows the system to assign Piece numbers starting at the next Piece number to be assigned.
Same Item/Piece Number [Bindery Only] Piece number gets assigned to the Item number if this option is checked.
A-Link Table Select the AVIAC record to ABLEä field mapping table to use. The tables are defined using the File Maintenance program. A window is opened with a list of valid mapping tables. The user selects the table to use from the list.
Z-Link Table Select the MARC record to ABLEä field mapping table to use. The tables are defined using the File Maintenance program. A window is opened with a list of valid mapping tables. The user selects the table to use from the list.
Cover Image Sets the default cover view to Image.
Cover Proof Sets the default cover view to Proof.
Compose See Field Editing Services.
Compose+ See Field Editing Services.
Format+ See Field Editing Services.
Global
Format If checked,
formats are added/retrieved to the master format list for all accounts with the
same Library ID. If unchecked, the
format is valid only for the current account.
Flash
Instructions If checked,
flashes the instructions button red when a record containing instructions is
brought up on the screen.
4.3.2 System Parameters
Users Define Operator ID’s, passwords and privileges. See description of the parameters in the File Maintenance reference guide.
Global System Parameters System based parameters. See description of the parameters in the File Maintenance reference guide.
Print
Queues Default
printer for each report. See description
of the Print Queues in the File Maintenance reference guide.
Font
Editor The
editor for creating and changing fonts. See
description of the Font Editor in the File Maintenance reference guide.
Global
Font Table A
list of fonts used for all accounts. See
description Editor in the File Maintenance reference guide.
Limit
Table The
Limit Tables are used to specify a range of levels based on the height of the
volume in which a title may begin. There
are two tables, one is used for Horizontal Titles and one for Vertical Titles. See description Editor in the File
Maintenance reference guide.
Height
Table The
Height tables are used to translate the title record implied levels to actual
levels. See description Editor
in the File Maintenance reference guide.
Note: ABLETM Bindery has an Event-Action table representing the correspondence between the ABLETM system Events and the Actions that are activated by these Events. This table is described in the File Maintenance Reference Guide.
Note: ABLETM Bindery has a Printer Selection Table that defines the target default printer for each report type. This table is described in the File Maintenance Reference Guide.
Note: The ABLEä Bindery EZ-Cut Services provide for the support of the Mekatronic’s EZ-Cut cloth selector and cutter. This service is not invoked from the Title Composition screen. The service is described in the EZ-Cut Reference Guide.
4.4 Print
Align UBS Align The UBS Forms In The Printer
Reprint UBS Reprint The UBS For The Volume
Auto UBS Set/Cancel Automatic UBS Printing
Use UBS Forms Set/Cancel Printing on UBS Form
Use Full Sheet Use this option to print all instructions on a full 8.5 x 11” size paper.
Print Library Instructions If checked, library instructions are printed on the UBS slip (only if Use Full Sheet is selected).
UBS Copies The number of copies of the UBS to print.
4.5 Process
Bindery Transfer services are provided in this menu selection. Refer to the Bindery Transfer Reference Guide.
The selections are:
- Receive From Library
- Clear/Transfer to Library
- Transfer to Library
- Auto Produce
- Auto Process
4.6 Update
Item
Add Item [ Alt I
] Adds an Item to the
current
Update
Item [ Alt U ] Updates
an Item
Remove Item [ Alt R ] Deletes an Item
Piece (ABLETM Bindery)
Add Piece [ Alt I
] Adds an Item to the
current
Update
Piece [ Alt U ] Updates an Item
Remove Piece [ Alt R ] Deletes an Item
Title
Add Title [ Alt T ] Adds a Title record to the current Account
Update
Title [ Alt U ] Updates a Title
Remove
Title [ Alt R ] Deletes a Title
Format
Add Format [ Alt M ] Adds a Format
Update
Format [ Alt U ] Updates
a Format
Remove
Format [ Alt R ] Deletes a
Format
4.7 Tools
ABLETM Bindery Only
Release Check
all Pieces in a Job before embossing.
(Refer to the Embossing Control Reference Guide)
Emboss Emboss
Services (Refer to the Embossing Control Reference Guide)
Divert Move the Piece to the “Error” Job (only for Job Piece Retrieval).
The Divert service is available at any time while using the Piece Retrieval Key. This is used when a Piece has to be diverted to another Job. The Release function need not be active to use this function.
The service is invoked using the Tools: Divert selection. The Piece is moved into the Error Job and the next Piece number is automatically selected for the piece.
Calculate The Calculate Measurements (Calc) option, Tools: Calculate MSR, allows causes the cloth and board values to be calculated as is done in the measurement process (MSR). The item/piece may not have these measurements if there was a problem during MSR where the volume was bypassed or incorrectly measured. Instead of returning to MSR to do the calculation, the Calculate MSR service is provided.
The Calculate MSR function can be used whenever an item/volume is displayed, including during the Release process or at any time during Title Composition.
The operator retrieves the item/piece and selects Tools: Calculate MSR. The calculation will automatically set the leaf attachment to round if the spine is below the System Parameter Thin Spine (Refer to (MODSYS) 'thinspine'.
Once calculated successfully the item/piece MUST be updated (F2) to save the calculations and the new leaf, if applicable. During Release, updating is a normal part of the process to move onto the next piece. But, at other times the user must also update the item/piece after calculating.
|
NOTE An item/piece processed by
the MSR program (i.e. going through the measurement process) is considered
"Measured" and "Calculated". An item/piece ONLY processed using the Calculate
MSR function is considered "Calculated". But, if an item/piece was measured and
needs to be recalculated, then it is considered to be "Measured"
and "Calculated". |
4.7 Window
Refer to Section 5 for detailed descriptions of these services.
Lot [
Alt L ] Select
the
Job [
Alt J ] (ABLETM Bindery) Select the Job for process.
Measurement [Alt
N] (ABLETM
Bindery) Select the Measurement process.
History [ Alt Y ] Display the binding history for the volume.
Collate [ Alt C ] Display the collating information for the volume
Title Display the Title Composition screen.
Bindery Transfer [ Alt B ] Displays the Binding Transfer screen.
Reports [ Alt P ] Displays
the Report screen.
Job Status [ Alt Shift A] (ABLETM Bindery) List the status of each Job. Jobs may be selected and then used for automatic services.
A-Link [ Alt Shift Z ] Display Import (A-Link) Retrieval screen.
Z-Link [ Alt Z ] Display Catalog System (Z-Link)
Retrieval screen.
Cover Image [
Alt S] Display
image of the front cover, back cover and spine.
File Maintenance Displays list of files and other services to be selected
(See the File Maintenance volume for details)
Account Account maintenance.
Binder Binder maintenance.
Cost Binder Cost maintenance.
Bill Billing maintenance.
Bindery Parameters Bindery parameter maintenance (e.g. class, leaf, …)
A-Link Mapping Import (A-Link) mapping table maintenance.
Z-Link Mapping Catalog system (Z-Link) mapping table maintenance.
Event-Action Table Defines automatic actions based on events.
Purge Purge operations.
4.8 Help
Standard Windows Help Facilities. Refer to Section 6 for explanations of these services.
Index
Title
Collation
History
Job Status
(Bindery Only)
Cover Image
Bindery Transfer
Reports
Measurement
(Bindery Only)
Release
(Bindery Only)
Emboss
(Bindery Only)
S3 Embosser
(Bindery Only)
A-Link
Z-Link
File Maintenance
Billing Statistics
Preventive Maintenance
EZ-Cut
(Bindery Only)
About ABLE
5. Title Screen Windows
5.1 Lot
The
Account ID The Library’s account with the Binder. The name of the account is also displayed. Refer to the File Maintenance volume.
Binder ID The Bindery identifier. It is also the Bindery contract identifier. The name of the binder is also displayed. Refer to the File Maintenance volume.
Title Count The number of Title records in the Account.
Last Title ID The next Title ID number to assign. The numbers are assigned sequentially.
Item Count The
number of Items in the
Last Item ID The next Item number to assign. The numbers are assigned sequentially.
Lot Status The
current status of the
Items Sent The number of volumes
sent in the
Cartons Sent The number of cartons
sent in the
Items Returned The number of volumes received in
the
Cartons Returned The number of cartons received in
the
Date Expected The
date the
Truck Route The Bindery truck route number.
Shipping Day The expected or actual shipping date depending on bindery usage.
Note: Multiple copies of an Item (using the "Copies" function) are counted as 1 Item.
Within the Lot window, the à and ß buttons cycle through the available lots within the current account (by Lot ID), the Apply button applies any changes made immediately, the Close button applies any changes made and closes the window, the Cancel button closes the window without applying any changes, and the Help button invokes the online help facility.
5.2 Lot and Job Status (Bindery Only) Screens
The Lot Status
screen displays every
Lot Status The
current status of the
Item Count The
number of Items in the
The list may be sorted by Lot ID and Lot Status by selecting the appropriate column header text. Also note that shift-clicking on one of these column headers will sort descending.
The Job Status screen (ABLEä Bindery) displays every Job Status of all Jobs with the following information:
Job ID The Job identifier.
Job Status The current status of the Job. See the Lot / Job Status Table.
Piece Count The number of Pieces in the Job.
The list may be sorted by Job ID and Job Status by selecting the appropriate column header text. Using shift-clicking on one of these column headers will sort in a descending order.
Selecting a
The Lot Status codes for ABLETM Library and the Job Status codes for ABLETM Bindery follow,
|
Status |
Status (5.x) |
Bindery Only |
Description |
|
|
blank |
|
Lot Created and ready for Items or Items are being added. |
|
Check out started |
cos |
|
Check out started |
|
Check out complete |
coc |
|
Check out complete |
|
Check in started |
cis |
|
Check in started |
|
Check in complete |
cic |
|
Check in complete |
|
Produced |
prd |
|
Diskette produced |
|
Restored |
res |
|
Restored |
|
Checked out |
co |
|
Checked out |
|
Returned |
ret |
|
Returned |
|
Checked in |
ci |
|
Checked in |
|
Released |
rel |
Yes |
Released |
|
Emboss started |
ems |
Yes |
Emboss started |
|
Emboss completed |
emc |
Yes |
Emboss completed |
|
|
prc |
|
|
5.3 Cover Image
The Cover Image menu choice allows the user to display an approximate image of the front cover, back cover and spine. The Cover Image is useful to inexperienced operators as well as experienced operators when difficult Titles are being composed. The ordinary usage of the system does not require the Cover Image display.
When measurements are available, then true image is displayed, including the effect of the automatic text fitting rules. When there are problems detected, an error statement is displayed and an attempt is made to display whatever text can reasonably be displayed with the error present.
Level and font information is displayed to correspond to the text. The level of each panel is displayed but it is approximate since pitch changes are not taken into account.
The font information displayed for each spine panel is the defined font number and the resulting font number. The defined font is the font assigned to the panel. The actual font number is the font the system selects based on the text fitting rules. Examples: (a) a "3/4" means that "3" was the defined font and the actual font used is "4"; (b) a "3 " indicates that no text fitting rules were applied.
Superscripts and subscripts are displayed as they would appear on the embossed cover.
5.4 History
The history menu selection displays history information for the displayed Title record. History information includes the following fields:
Title ID The Title ID for the history data
Account ID The Account for the Title.
Binder ID Binder ID of the Binder
Last Lot The last
Expected The date the Item is expected back from the bindery.
Operator ID The library Operator ID responsible for
the transferring the
Entry The date the Title record was created.
Update The date the Title record was modified.
History Entries History entries are scrolled when there is not enough room to display the complete set of entries.
Date The date the history information was recorded.
Variable Name/variable data used in the binding process
Remark
Title history
can be modified or deleted by the library user by double clicking on an entry
in the History table. The Close button applies any changes and closes the window, while the Help button invokes the online help
facility.
History Storage
The latest three history entries are stored in the Title record and remain until they are displaced by later bindings for the Title.
The additional history entries are stored in the Extended History file. The Extended History file is a giant FIFO (first-in, first-out) file. The oldest entries in the file are purged during file maintenance purges.
The history data is updated at
points in
Library Diskette Production / Transfer to Bindery
The history variable data is added to the corresponding Title history data.
Bindery Diskette Production / Library Transfer (ABLETM Bindery)
When the bindery creates
diskettes or transfer the
Library Diskette Restoration
When the
5.5 Collation
A screen is displayed with collation information. Collation information are additional instructions for processing the volume. The fields are:
Trim / Amounts Valid values are displayed in a pull down list (see note).
Top
Bottom
Front
Title Page Title page instructions (e.g. front, back)
Contents Table of contents instructions
Index Index instructions
Front Front cover instructions
Back Back cover instructions
Ads Advertisement instructions
Extras/Specials Each entry provides three
descriptive fields as follows:
Minutes The time to accomplish the task (invoiced time).
Code – Operation The operation to perform.
Source The origination of the entry. See below.
Note: Trim Values
The
Trim values to be used for the binding class are defined:
1. Top 0
– No trim
1 -
Shave
2 – Default
(2/16 inches)
4 -
Oversize
These values correspond to 1/16
ths of an inch. Zero (0) is assumed to
be no trim.
2. Bottom The bottom trim values are the same
values as Top.
3. Front The front trim values are the same as Top.
Sources of Extras/Specials
The Extras/Specials may be entered by the user and be automatically entered by the system. When one of the sources is used, the Extras/Specials defined for the source automatically appear in the Extras/Specials list. The sources are:
· Acct Record Account records
· Class Class definition record
· Title Title record
· Leaf Attach Leaf Attachment definition record
· Manual Entry Manual entry (user entered)
In the Collation window, the Apply button applies any changes immediately, the Close button applies any changes and closes the window, the Cancel closes the window without applying any changes, and the Help button invokes the online help facility. Also, the right mouse button allows one to insert or delete text fitting rules by providing New and Delete functions, and the Insert and Delete keys allows the same functionality (note as well that striking Enter after editing the entire row should insert a new row).
5.6 Job (ABLEä /Bindery)
The Job menu selection is used to create and modify Job information and to select the Job to use. The cursor is placed in the Job ID field. The Job screen contains the following fields:
Job ID The active Job ID. An empty indicate there is no active Job.
No. Pieces The
number of Pieces in the Job.
Last Piece Number The last Piece Number used.
Job Status The status of the Job. See below.
Job Station The last station that processed the Job
.
Embosser Type The embosser type. The last selected value is the default when a new Job is created.
GEM (GEM)
RB7 (RB7/11)
SII (System 2)
S3 (System 3)
<blank> (none)
Embosser Unit For S3, the Wheel Unit Number is defined.
For other embossers:. This field is for information purposes only. No processing is performed based on this field.
Date Entered The date the Job was created.
Date Due The date the Job completed.
Date Shipped The date the Job was completed.
Error Job The Job used during Release when the "divert" function is selected. This should be a valid Job ID. Refer to the Release section..
Comments Comments entered by a crafts-person about the Job.
Leaf Attachments The Leaf Attachments used for the pieces of the Job are listed with the number of times they are used (count). The information is summarized by:
Round (Rnd)
Flat (Flt)
No Trim (NoTrim)
Trim (Trim).
When Lots are transferred from the Library (e.g. Internet, diskette) the Lot Items are placed into the Hold Job. The Hold Job is a special repository of Lot Items that have not been assigned to actual Jobs. Items in the Hold Job are placed into an actual Job by:
·
Select the
· Select the Job ID - Bindery Job
·
Select the Item retrieval key - Retrieve Items from the
· Add each Item to the Job - Add Piece button.
5.7 Release (ABLE Bindery)
The Release service is used by binderies to verify that each volume is ready for embossing. After Measurement, the next required ABLETM Bindery step for a Job is its Release to prepare for embossing.
It is expected that only a very small percent of the Job's Pieces will not text fit. When there are no text fitting errors in the Job then the Job is ready for embossing.
If there are errors the user must correct the errors before ABLETM allows the Job to be successfully Released. The user has three choices (depending on the type of error):
(a) correct the error
(b) override the error
(c) divert the Piece to an "error" Job.
The Embossing Control volume describes the Release service and other embossing related services.
6. Miscellaneous Title Composition Services
6.1 Flexible Screen Layout
The Title Composition allows for custom screen layouts by adjusting the size of three of the screen sections:
1.
Section with
Library and Bindery Data (Title ID to Vol Stat)
2.
Section with
Fonts, Spacing and Levels
3.
Title Text
Area
The Title Text Area becomes larger as the Fonts, Spacing, and Levels section or the Library and Data section become smaller.
6.2 Help Facilities
The ABLEä has extensive on-line help facilities. There are the following services:
· Online Reference and User Guides
· Tool Tips
· Contents & Index Help Services
Online Reference and User Guides
The online guides may be access from the ABLE folder using the web browser. The list of documents available are presented. The guides are viewed using a web browser.
When the cursor is placed on a field label, an explanation of the field is displayed. This is an easy way to understand every field on the ABLETM screens.
Contents & Index Help Services
Comprehensive online help is available using this standard Windows help facility. It is invoked by selecting the Help menu bar selection.
6.3 Action Buttons
There are Action Buttons under the standard Menu Bar to facilitate activating commonly used services. These services are also available from the Menu Bar and by using Alt key sequences. The Action Buttons are,
Add Item (or Add Item/Piece for Bindery)
Upd Item (or Upd Item/Piece for Bindery)
Add Title
Upd Title
History
Collation
Job (Bindery only)
Clear (F3)
6.4 Persistent User Parameters
These parameters are remembered from one ABLEä session to another.
General
Setup Parameters All of the Setup parameters (User/Workstation and System) are persistent.
Specific
Account The last Account ID accessed at the workstation.
Automatic Calculation If measurements should automatically be calculated during release.
Automatic end papers If an end paper should automatically be printed for each piece processed at the MSR workstation.
Automatic Job MSR Report If the Job MSR Report should be printed when a Job is released.
Automatic Library Purge Used to tell ABLEä Library to automatically initiate the purge function when ABLEä is started or not.
Automatic
Automatic
Automatic Piece Select If piece numbers should be automatically assigned by the system or manually assigned by the operator.
Automatic Text Fit If the piece should be text fitted during processing at the MSR workstation.
Automatic
UBS If a binding
slip (or piece ticket-ABLEä
Bindery) should be printed when an item is added to a
Binder Contract The last Binder accessed at the workstation.
Cloth Bin Table Which Cloth Table to use.
COM Port Which COM port the GEM is attached to.
Compose+ Default The system allows for the default mode of Title Composition and Embosser Control to be Compose+ or normal mode of operation. Compose+ causes the previous titles information to remain on the screen after the title has be saved. The data can then be used for composing the next title. YES means that Compose+ mode should be the system default (until changed by the operator).
Embosser Type The embosser type (RB7, GEM, SII, or S3).
End paper Form The end paper form to be used.
End paper Table Which end paper table to use.
GEM Embosser Table The GEM's table type (a value of 0 or 1 indicates the old table (smaller) and 2 indicates the new expanded table).
GEM Type The type of GEM; i.e., Crestron or Galil.
HOLD
Job Purge If the HOLD
job should be purged.
Inverted end paper If the end paper should be inverted.
Job The last Job accessed at the workstation.
Last Key The last key type selected.
Last Report The last report selected on the Report screen.
Last Sort Key The last sort key selected on the Report screen.
Lot Device Which
local destination to restore/produce from.
MD-17 If an MD-17 is attached to the workstation.
MSR Retrieval Key If the pieces are to be retrieved by piece number or scanned.
Narrow Paper If reports are to be printed on narrow or wide paper.
Operator The last operator who accessed the ABLEä workstation.
Print Mode If a binding slip or piece ticket is to be printed when a piece is added to a Job.
Print Report Flag If the Lot Costing report should be printed when selected from the Report program.
Printer
If a
full printer or a slip printer is to be used for printing the piece tickets.
Report Text fitting Errors If text fitting errors should be displayed during MSR processing.
Restrict Job ID to 4 Numerics Used to tell the system that a restricted Job ID should be the only Job ID format allowed. YES (Y) means that the restriction should be applied. This value is usually YES for SII and NO for other systems.
Standalone If standalone MSR has been chosen.
System 3 wheel file directory The location where each wheel directory is placed.
UBS Form If a UBS form is to be used for printing the binding slips.
Workstation ID The name of the workstation.
Font
Definition Codes The number of
fonts for some customers may exceed our current maximum of 36. The current code is a single character with
the values of 0-9, a-z where a-z are case insensitive.
This parameter allows a font code to take on addition values by removing the case insensitivity. This allows 58 font codes. This means that a is different than A. A Bindery System Parameters, Font Case, enabling case sensitivity, is defined to maintain compatibility with existing systems.
A single letter is preferred for ease of
data entry and for maintaining the simplicity of the user interface.
Appendix A - Universal Binding Slip (UBS)
The Universal Binding Slip (UBS) form is the bindery work order for an
Item in a
Table 1 - UBS Fields
|
FIELD |
FIELD IN FILE |
PRINTED DATA |
|
Account ID |
Account ID |
as per record |
|
Title ID |
Title ID |
as per record |
|
Dept. |
Department |
as per record |
|
ISSN |
ISSN/ISBN |
as per record |
|
Private ID |
Private ID |
as per record |
|
Bind. Freq. |
Binding Frequency |
as per record |
|
Pub. Freq. |
Publication Frequency |
as per record |
|
Title Page |
Title Page |
as per record |
|
Front Cover |
Front Cover Page |
as per record |
|
Table Cont. |
Table of Contents |
as per record |
|
Back Cover |
Back Cover Page |
as per record |
|
Index |
Index |
as per record |
|
Ads |
Advertisements |
as per record |
|
Int. Ins. |
Internal Instructions |
as per record |
|
Cust. Lot No. |
|
as per record |
|
Item No. |
Item Within |
as per record |
|
Binding Class |
Binding Class |
expansion |
|
Leaf Attachment |
Leaf Attachment |
as per record |
|
Level |
Level |
as per record |
|
Title |
Title Text |
as per record |
|
Category |
Type of Volume |
expansion |
|
Print Date |
Today's date |
mmddyy (e.g. 010294) |
|
Cover Color |
Cover Material Color |
as per record |
|
Entry Date |
Entry (Creation) Date |
as per record |
|
Print Color |
Foil |
as per record |
|
Update |
Modify (Change) Date |
as per record |
|
Spine |
Spine Width of Volume |
as per record |
|
Height |
Spine Height of Volume |
as per record |
|
Width |
Width of Volume |
as per record |
|
Bar Code Data |
Bar Code Sequence No. |
as per record |
|
Bar Code |
Bar Code Sequence No. |
bar code |
|
Copies |
Copies |
as per record |
|
Date Expected |
Date Expected |
as per record (first 8 chars) |