ABLETM
Advanced Bindery Library
Exchange
Reference
Guide
Volume 10
Bindery Transfer
Version 6.6.2
August 11, 2003
ABLEä Ventures, LLC
Copyright by ABLEä Ventures, LLC
This reference guide is copyrighted and all rights are
reserved. This document may not, in
whole or in part, be copied, photocopied, reproduced translated, reduced to any
electronic medium or machine readable form without prior consent, in writing,
from the ABLEä
Ventures, LLC.
The information in this document is subject to change without notice. The ABLEä Ventures, LLC assumes no responsibility for errors that may appear in this document.
For more information visit the ABLEä web site: http://www.programmingconcepts.com/able/
Or contact,
ABLEä Ventures, LLC
c/o Paul Parisi
ACME Bookbinding
(800) 242-1821
For technical support contact:
Programming
Concepts, Inc.
web site: http://www.programmingconcepts.com/able/
e-mail: able_support@programmingconcepts.com
telephone: 631-563-3800 x230
fax: 631-563-3898
ABLEä
Ventures, LLC
Acme Bookbinding
Information Conservation, Inc.
Kater-Crafts Bookbinders
Lehmann Bookbinding
Mekatronics Inc.
National Library
Binding of
Ocker & Trapp Library Bindery Inc.
Programming Concepts, Inc.
ABLEä
is a trademark of Mekatronics, Inc. / Bendror International Inc. 1987-2001
2. Bindery Transfer Screen Fields
3.5.3 LARS Account Configuration File
3.6 Additional Services (Auto reports – Bindery
Only)
6. Setting Restore Criteria Flags
Appendix A
- Restore Criteria Flag Codes
Appendix B
- Account/Binder Record Update
Fields
B.1 Updated Binder And Cost Fields
B.2 Updated Account Record Fields
Release Notes
V6.0 Preliminary release for review.
V6.01 Changes for ABLEä release 6.01.
V6.02 Changes for ABLEä release 6.02.
V6.3 Changes for ABLEä release 6.3.
V6.4 Changed copyright. Added lot transfer version in Produce section.
V6.6.1 Added [VARIABLES] section for LARS translation file.
The ABLEä Reference Guide is comprised of multiple volumes. The collection of volumes describes the functional and operational characteristics of ABLEä. The volumes are:
|
Volume |
Reference Guide |
File Name |
|
1 |
r6-intro.htm |
|
|
2 |
Library User |
r6-library-user.htm |
|
3 |
r6-user.htm |
|
|
4 |
r6-title.htm |
|
|
5 |
R6-style.htm |
|
|
6 |
r6-report.htm |
|
|
7 |
r6-control.doc |
|
|
9 |
r6-maint.htm |
|
|
10 |
r6-transfer.htm |
|
|
12 |
R6-emboss.htm |
|
|
13 |
r6-help.htm |
|
|
15 |
r6-bill.htm |
|
|
16 |
r6-pm.htm |
|
|
19 |
R6-s3.htm |
|
|
20 |
r6-linstall.htm |
|
|
21 |
r6-binstall.htm |
|
|
22 |
r6-ezcut.htm |
|
|
23 |
r6-ftp.htm |
|
|
24 |
r6-alink.htm |
|
|
25 |
r6-zlink.htm |
|
|
27 |
r6-file-import.htm |
This volume describes the Bindery Transfer program. The program provides the following services:
ServiceABLETM LibraryABLETM BinderyTransfer
Library to Bindery (Produce)YesYesTransfer Bindery to Library (Restore)YesYesAutomatic
The Transfer functions provide for the transfer of title data between the Bindery and Library. The function is initiated by selecting the Window: Bindery Transfer selection from the main menu bar. The Bindery Transfer screen is then displayed.
Automatic Lot Production utilizes the contents of the selected “restoration file” to automatically determine the Lots to be transferred. The basic assumption is that the transfer information sent by the library is the same to be sent back to the library.
Automatic Account Processing
provides for the automatic updating/creating of titles and history information
for Lots that were successfully Released. Report(s) may also automatically generated
and printed for each
The Title data is transferred on diskettes in Lots as Lot Items. The flow of information between Bindery and Library is summarized in Figure 1.
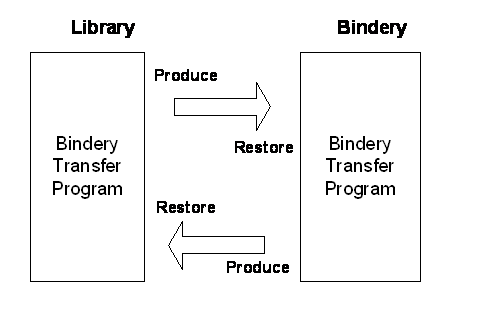
Figure 1
- Production/Restoration Cycle
The processing at each stage is summarized as follows:
Library
Production Process
The Library creates Lots and adds Items to the Lots. The Bindery Transfer program is then used to produce transfer files containing the Lots to be processed by the Bindery.
Additional Processing:
The
When a
Title records deleted at the Library need to be purged from their Binder's database. The Deleted Title file identifiers are also transferred to the Bindery.
Bindery
Restoration Process
The Lots are transferred using the Bindery Transfer
program. Lots are created for the
Account specified. The
Additional Processing:
The Bindery Transfer restoration process first deletes all of the Title records specified in the library transfer information according to the Account’s Restore Criteria. The deleted Title records are printed to the log file, prdres.log.
Bindery
Production Process
The completed Lots are transferred to library using the Bindery Transfer program Produce option. The Lot status is set to "Produced".
Additional Processing:
The associated Title records are created or updated following the rules setup for the Account. The History data is also created for the associated Title.
When a Lot item does not have a corresponding Title record and its “Category” is specified in the Restore Criteria, a Title is automatically created as part of the Bindery Transfer process.
The associated Account and Binder records for the Lots are also transferred.
The associated Binding Cost and Billing Statistic records for the Lots are also transferred. The Default cost record and the individual Binder's Cost record are combined to create the Binder's Costs. It is this record that is transferred.
Title records that were deleted at the bindery need to be purged from the associated library's database. The Deleted Title file identifiers are transferred to the library.
The Bindery Transfer program provides an option to select the drive with the diskette to be produced. Since not all accounts are ABLETM Library accounts the option to select "none" is provided. The "none" option causes the History to be updated and the data to be updated without performing the actual transfer.
There is an Automatic Account Processing option. All Lots that have successfully been released have its Title data and History updated and an optional Lot Item and/or Lot Costing report printed on the printer. Binding slips may be generated for each processed Lot if AutoProc UBS is set in the Account record. See Volume 9 (File Maintenance) for further details.
Note - ABLETM Bindery
A Lot is considered released if all the items that comprise the Lot are in Jobs that have been released or embossed. Items left in the Hold Job will not stop the Lot from being processed, unless all items in the Lot are in the Hold Job.
Library
Restoration Process
The Lots are loaded from diskette (restored) using the Diskette Control program.
Additional Processing:
The restoration process first deletes all of the Title records specified in the transfer information according to the Restore Criteria. The Title records deleted are printed to the log file, prdres.log.
The associated Title records are created or updated following the rules setup by the Library for the account. A subset of the associated Binder and Account records are also updated following the rules setup for the Account. The History data is also updated and the Lot status is set to "restored".
The associated Binding Cost records are also updated following the rules setup for the Account. The associated Billing Statistics data are also created or updated.
Any item in a Lot that was not processed at the Bindery has a status of "hold". A status of "proc" indicates the item was processed. This status appears in the lower left-hand corner in the Vol Stat field of the Title Composition screen.
NOTE: Title records are ONLY created and updated during Bindery Produce and Library Restore. The Binder, Account and Cost records are ONLY updated during Library Restore. Also, during Library and Bindery restoration, the user is prompted for Binder, Account and Cost record creation should they not exist. Binding Cost and Billing Statistic records are ONLY written to the transfer file during Bindery Produce and created/updated during Library Restore.
Library
Catalog System Status Changes
While a Lot is being processed, the volumes in the Lot are out-of-circulation. The Library Catalog System can be informed of this change in status as follows:
After a Lot is Produced and Restored, the Lot Item Status report is “printed” to paper or to a file. If the report is printed to paper, the volumes may be updated by a user directly on the Catalog System.
If the Lot Item report is "printed" to a file, the file can be imported into another program like an Excel spreadsheet. The file can then "formatted" for their specific catalog system update requirements, including indicating if it is "at bindery" or "back from bindery" status. The assumption is that there is an interface to the Catalog System that may be used for this purpose.
2. Bindery Transfer Screen Fields
The Transfer Control screen fields are summarized in this section.
Header
Fields
Account ID The library currently selected
Binder ID The binder currently selected
Lot ID The Lot ID currently active (i.e. selected)
Lot Status The status of the current Lot.
Internet / Local Buttons to select transfer type
Summary
Information (for each Lot Restored or Produced)
Account ID The library for a processed Lot
Lot ID The Lot ID of a processed Lot
Department The Department for the processed Lot
Items The number of items restored or produced
Category-Qty The quantity of items within each unique category for a
Class-Qty
The quantity of items within
each unique class for a
There are also Close and Help buttons available to save any modifications and dismiss the Bindery Transfer screen or to access the online help system, respectively.
The Bindery Transfer services are accessed using the Process menu selections.
For ABLETM Library
Receive From Bindery Initiate the restore process
Clear/Transfer To Bindery Clear current transfer files and initiate the produce process
Transfer To Bindery Initiate the produce process
For ABLETM Bindery
Receive From Library Initiate the restore process
Clear/Transfer To Library Clear current transfer files and initiate the produce process
Transfer To Library Initiate the produce process
Auto Process Initiate the automatic account process
Auto Produce Uses the current transfer files as the source of the Lots to transfer
The restore service reads the Lots to be transferred into the library or bindery. Summary information is provided as the process proceeds. In the case of ABLETM/Library, the process is automatic once initiated and will restore all Lots that are associated with the specified library Account.
For ABLETM/Bindery, however, the user is given the ability to restore some or all of the received Lots that are associated with any valid Account. A screen will display a complete list of all Lots with their corresponding Accounts that can be restored from either a local drive location or from the Internet.
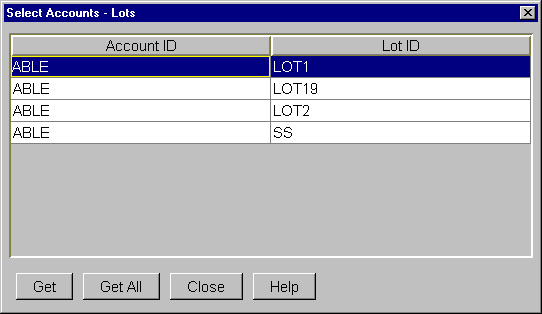
Figure 3.1.1 – Select Accounts-Lots Window
On this screen (see Figure 3.1.1), there is a “Get” button and a “Get All” button. If the user highlights one or more rows on this screen and clicks “Get”, only those Lots that are highlighted will be restored. If the user clicks “Get All”, then all of the displayed Lots will be restored.
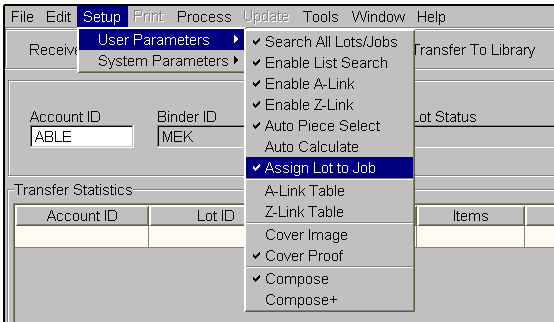
Figure 3.1.2 – Menu Option – Assign Lot to Job
If the “Assign Lot to Job” menu option (see Figure 3.1.2) under Setup/User Parameters is selected, then clicking either the “Get” or the “Get All” button will pull up a popup window (see Figure 3.1.3) into which the user can enter a Job ID that the given Lots will be assigned to. If the specified Job is not in the database, the user is given the choice to create the Job or cancel out. If it is an existing Job, the Lots will be assigned automatically to this Job.
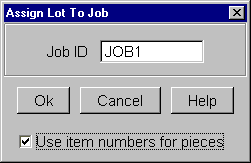
Figure 3.1.3 – Popup Window – Assign
If there is only one highlighted Lot to get, the user may choose to assign the Item numbers of the selected Lot to the Piece numbers of this Job by checking the checkbox labeled “Use item numbers for pieces”. This checkbox is disabled when more than one Lot is highlighted or when the user chooses “Get All”, since the Piece numbers of individual Jobs cannot be meaningfully mapped to the Item numbers of multiple Lots.
For ABLETM/Bindery, if the “Assign Lots to Jobs” menu option is not selected, the Lot items are placed into the HOLD Job. The Pieces can then be removed from the HOLD Job and placed into actual Jobs to be processed. Refer to the Title Composition volume.
The produce services starts the process of placing Lots onto the transfer medium (e.g. Internet, file, diskette) for transferring to the library or bindery. The user steps are:
Select the target for the Lots to transfer: select Internet or Local.
The format of the transfer data to the library is dependent on the ABLEä version setting in the Account record.
ABLE version
5.x 5.0
5.0
6.4
6.5
6.5
For ABLETM Bindery there is a check to verify that the clear function is used for a diskette that was produced by a library. If the transfer medium has not been cleared an error message is displayed. The operator cannot proceed with the produce until the medium has been cleared.
The Auto Produce option replaces the Lots on the medium selected for Local transfers. The Lots to produce are read from the medium sent by the library. The basic assumption is that the same medium the library sent to the bindery is used as the medium to return to the library.
When doing Auto Produce, the version number on the medium is compared with the Account record. The user is warned if the versions do not match.
The Auto Produce option for Internet transfers brings up a list of lots along with their respective expected return dates in a dialog. Only lots that have a status of processed are displayed. The operator chooses one or more lots to transfer back to the Library, or has the option to transfer all lots displayed.
The Auto Process service starts the
process of updating the Title and History data for the Lots that have been
successfully Released. An optional Lot
Item and/or Lot Costing report can be printed in addition to Binding Slips for
each processed
The process is automatic once initiated by first
selecting Auto Process. After each
released
ABLEä Library and Bindery allow the operator to specify the
LARS transfer format for producing and restoring an ABLEä lot.
To specify the LARS transfer format, select SetupàTransfer VersionàLars Format on the Bindery Transfer screen. This is required for producing and restoring a lot in LARS format. If producing or restoring a lot in ABLEä format, select the “ABLE Format” option in this menu. ABLEä produces a LARS lot in one of two formats (see the following section for more details).
The LARS translation file is used to convert data during the lot produce and restore process. Each ABLEä account that produces or restores LARS lots must use a translation file. Multiple ABLEä accounts may share the same translation file.
The default LARS translation file is defxlate.ini and exists in the able\library\config (or able\bindery\config directory). The following details the different sections that exist in the LARS translation file. Values on the left side of the equal sign are LARS settings and values on the right side of the equal sign are ABLEä settings. A value of “*” means any value translates to the value specified.
[VERSION]
This section defines the format of the LARS lot transfer file that ABLEä produces a lot in. The valid entries are as follows:
FORMAT=1
FORMAT=2
Format 1 is the default if the VERSION section does not exist in this file. Use Format 2 if the lot file is missing the following fields:
SETSIZE, I4BATCH, I4RECNO, and ILSKEY.
[VARIABLES]
This section defines the start and end characters for variables and comments. If this section is not defined, the default start variable character is ‘<’ and the end variable character is ‘>’. The default entries for this section are:
VAR_START=<
VAR_END=>
[AXIS]
This section defines the default axis for LARS group names in the TTX file. ABLEä does not use an axis field, so the value on the right side of the equal sign is the ABLEä placement code. The default settings in this file are:
H=C
V=V
V=3
H=*
In this example, any ABLEä placement not listed above is mapped to an H axis in the LARS record.
[SUBSCRIPT]
This section defines how to translate ABLEä and LARS subscript characters. The default settings in this file are:
~1~ =1
~2~ =2
~3~ =3
~4~ =4
~5~ =5
~6~ =6
~7~ =7
~8~ =8
~9~ =9
~0~ =0
For example, and subscript 2 in ABLEä is written out as ~2~ in the LARS record.
[SUPERSCRIPT]
This section defines how to translate ABLEä and LARS superscfipt characters. The default settings in this file are:
~!~ =1
~@~ =2
~#~ =3
~$~ =4
~%~ =5
~^~ =6
~&~ =7
~*~ =8
~(~ =9
~)~ =0
For example, and superscript 2 in ABLEä is written out as ~@~ in the LARS record.
[CITITLE]
The CITITLE section defines the Title Page collation code translation. The default settings in this file are:
*=*
In this example, all ABLEä title page codes are sent as is with no translation.
[CICONT]
The CICONT section defines the Table of Contents collation code translation. The default settings in this file are:
*=*
[CIINDEX]
The CIINDEX section defines the Index collation code translation. The default settings in this file are:
*=*
[CIFRONT]
The CIFRONT section defines the Front Cover collation code translation. The default settings in this file are:
*=*
[CIBACK]
The CIBACK section defines the Back Cover collation code translation. The default settings in this file are:
*=*
[CIADS]
The CIADS section defines the Ads collation code translation. The default settings in this file are:
*=*
[FASTENING]
The Fastening section defines the leaf attachment code translation. The default settings in this file are:
*=*
[FOIL]
The Foil section defines the foil color translation. The default settings in this file are:
G=GOLD
W=WHIT
*=*
[FONT]
This section defines the translation of ABLEä font id to LARS font id. The default settings in this file are:
*=*
[GROUP-NAME]
The Group-Name section defines the ABLEä variable prompt associated with LARS group names in the LARS lot file. The only recognized LARS group names are Title, Variables, Author, Call Number, and Imprint. The Variables group does not have a translation since the actual variable prompts are contained within the Variables section. The default settings in this file are:
Title=TITLE
Author=AUTH
Call Number=CALL
Imprint=IMPRINT
Using these settings, an ABLEä record will use TITLE, AUTH, CALL, and IMPRINT to define their respective panels.
[JUSTIFICATION]
This section defines the translation of ABLEä placement codes to LARS placement codes. The default settings in this section are:
CC=C
LL=V
LL=3
FC=F
*=*
[MATERIAL]
This section defines the translation of ABLEä cover colors to LARS colors. The default settings in this section are:
000=BUC
189=188
*=*
[SLOTS]
This section defines the translation of ABLEä and LARS level numbers. The default settings in this section are:
*=*
[UNITS]
This section defines the units in which measurements are stored in the LARS lot file in 1/1000 of an inch. A value of 1000 means the units are in inches. The default settings in this section are:
HEIGHT=625
WIDTH=625
SPINE=625
[TYPE]
This section defines the translation of ABLEä and LARS Category codes. Default settings in this section are:
*=*
[TSTYLE]
This section defines the translation of ABLEä Formats. Default settings in this section are:
*=*
3.5.3 LARS Account
Configuration File
The LARS account configuration file is used to specify the ABLEä to LARS account name mapping along with the translation file to use in the produce or restore process. This configuration file is named larsacct.ini and resides in the able\library\config (or able\bindery\config) directory. The format of this file is as follows:
[<Translation
file>]
<LARS account> = <ABLEä account>
Some LARS installations use sub-accounts. If so, a hyphen “-” character is used to separate the LARS account and sub-account. Below is an example configuration file and description of the entries:
[defxlate]
1000=1500
2000=2000
[ABLE]
3000-250=ABLE
In the above example, ABLEä accounts 1500 and 2000 use the default translation file (defxlate.ini), while account ABLE uses translation file able.ini. For account ABLE, the LARS account is 3000 and the sub-account is 250.
3.6 Additional Services (Auto reports – Bindery Only)
There are options, reports and other services needed to use the Bindery Transfer program. (Refer to the Title Composition Reference Guide, Setup Parameters section.)
Automatic
Automatic
Auto
4. Restore Criteria Rules
The rules for updating the Title, Binder and Account records are defined by the Bindery and Library for each account.
A default set of rules (restore criteria) are defined to assist in defining the rules for each account (see the next section). The default rules are displayed on the Window: File Maintenance: Account screen when a new account is created. The operator can then change the rules for the special accounts.
The Account record restore criteria flags are used to determine how to:
Update a subset of the Account and Binder records,
Update the Binding Cost records,
Create Title records when only the Item record exists,
Process each field in the Title record during the restoration of the Item to the Library system and Bindery system.
The restore criteria flags are described in Appendix A.
4.1 Exception Variable Rules
This section provides a description and rules for the "Text Exception" restore criteria flags (20-39). Text Exception processing provides a mechanism for NOT updating specific variables. For example, <Year> and <Month> are usually not updated in the title record since each embossing is different.
During the title update or title creation process, the title record is replaced by the item record from the restoration diskette. When "Text Exception" variables are used, the title text (and associated level, pitch, placement, font) may not be updated if any one of the rules described below are not valid for the title and item being processed. If a rule is broken then an exception message is put into the Exception Report and the title text (and associated level, pitch, placement, font) are not updated. All other title fields would be updated.
The Text Exception restore criteria flags 20-39 contain a list of up to ten exceptions. Each exception specifies the first one or two characters of Title/Item variables which are to be considered as candidates for Text Exception processing. All Title/Item variables that match an exception are called exception variables. (Note: Each exception variable must be at least two alphabetic characters. One character text exceptions are allowed. Two characters are still required but the second may be left blank).
Two or more exception variables with the same name can be processed. For example, <VOL> on the spine and <VOL> on the front cover is a valid condition.
The following are a set of rules that must be satisfied before any exceptions are applied to title text. If any of the rules are violated the title text will NOT be updated.
1. An exception variable in the title must have a corresponding exception variable in the item (but it is valid to have the exception variable in the item and not in the title). The exception variable exists in both the title and item records if they have the same variable name. Note that <Volume> is different than <Vol>. But, <Vol> and <VOL> are a match since the rule is not case sensitive.
2. When the same exception variable appears more than once in the title record, it must also appear the same number or more times in the item record. (i.e. <VOL> on the spine and front cover of an item must have a corresponding <VOL> on the spine and front cover of the title.) Also, the physical and logical locations of the corresponding exception variables must be identical. Any additional ITEM exception variables will be inserted into the title record without variable text. (See below for definitions of physical and logical locations.)
3. When an exception variable in the title record contains variable text, it must match up physically and logically with the corresponding exception variable in the item.
The definitions of physical and logical match are:
1. Physical
Match
(a) Both corresponding variables must start on the same screen line, and
(b) The title's exception variable must fit into the space occupied by the corresponding variable in the item. The space is defined as the available text area from this variable up to the start of the next variable.
2. Logical
Match
All the levels, pitches, placements, and fonts associated with the title record's exception variable must match the corresponding data in the item record.
Additional rules are defined to enhance the processing of Text Exception variables:
1. When an exception variable in the title record does not contain text, and none of the exception rules described above are violated, then the physical and logical restrictions do not apply. (i.e. the exception variable appears only once in both the title and the item record and it contains no text in the title record.) In this case it is automatically moved within the title text area to correspond to the item record.
2. A Text Exception restore flag criteria array can be used for a class of variables with the same first two characters. For example, the variables <VOL> on the spine and <VOLUME> on the front cover are completely different exception variables but are still exception variables because "VO" is in Text Exception restore criteria array.
3. When title records are created from item records the item record is created as a title record and the exception rules are followed. This means that all exception variables are placed into the title record without variable text.
5. Restore Criteria Flags
The allowable flag codes and their meanings are given in the appendix. (Note that these values DO NOT apply to every field. The exceptions are explicitly indicated.)
A Always Update
N Never Update
Blank for field 00 means use individual fields 01-19.
Blank for fields 01-19,60,61 means Never Update.
C Update and notify if value is different in the Exceptions Report
Q Compare and query for update if different. NOTE: this option should not be used if automatic Account Processing is used since operator intervention would interfere with the efficient processing of all released Lots.
The last option causes a dialogue box to appear on the screen so the operator can review the inconsistency. If the Q option is selected, then the operator can decide if the update is needed.
The Title Creation/Update rules are:
(1) Only create a Title if its category is specified in the restore criteria flags (40-49).
(2) Only update a Title if its category is NOT specified in the restore criteria flags (50-59).
6. Setting Restore Criteria Flags
The Maintenance program provides for creating Account records. The Account Maintenance screen provides an array for entering and changing restore criteria flags.
If the restore criteria are not defined, then the defaults displayed are to always update all fields (see fields 00, 60, 61, 62).
Appendix A - Restore Criteria Flag Codes
This appendix describes the restore criteria flag codes defined in each Account record. The File Maintenance : Account : Restore Criteria windows (see the File Maintenance Reference Guide) uses.
FLAG DESCRIPTION ______________
00 Global Title restore flag - fields 01-19 are either:
(A) - copied,
(C) - compared and notified for update,
(Q) - compared and queried for update,
(N) - never copied or blank.
If this field is blank then the restore criteria for fields 01-19 are used. If this field is non-blank then fields (01-19) are ignored.
01 Retrieval Keys - Private ID, ISBN ID
02 Default Binder ID
03 Category
04 Class
05 Leaf Attachment
06 All Collating Instructions: Title Page, Table of Contents, Index, Front Cover Page, Back Cover Page, Advertisements.
07 Text Fitting Rules
08 Cover Color
09 Foil
10 Spine Height, Spine Width, Volume Width (Not displayed on Title Screen)
11 Format Used
12 Binding & Publication Freq.
13 Department
14 Collection
15 Dates: Modification (Change) Date, Modification (Change) Operator ID, Expected Return Date, Actual Return Date.
16 Internal Instructions
17 Set
Of
18 Reserved: Reserved for future use.
19 Title Text - This flag governs the updating of the Title text including associated fonts, pitches, placements, and levels. If flag 00 is (N) the text exceptions ARE NOT utilized regardless of this flag's setting. If flag 00 is (A,C,Q) the text exceptions ARE utilized regardless of this flag's setting. If flag 00 is blank, then the text exceptions are applied only when this flag's setting is (A,C,Q).
Examples,
1)
flag 00 = N
The text exception fields are not utilized.
2) flag 00 = A
The text exception fields are utilized.
3) flag 00 = blank and flag 19 = A
The text exception fields are utilized.
If the Call Number ID in the Title Text changed, then the Call Number ID Key is also changed. If the Title in the Title Text changed, then the Text Key ID Key is also changed.
20-39 Text Exceptions - Two characters per field. There are 10 fields available. Each field contains the first one or two letters of a Title Text variable field that SHOULD NOT be updated. For v3.2, if one letter is entered followed by a space, then all variable need only match on the first letter
Note -- associated fonts, pitches, placements, and levels are updated as necessary.
Example, "MOYEVO______________"
specifies MOnth, YEar, and VOl fields are NOT to be updated.
Example (v3.2), "M_Y_V_______________"
specifies Month, Year, and Volume fields are NOT to be updated.
40-49 Create Title Categories - two character fields specifying up to five categories of titles that are to be created. Both characters are required to identify the field.
50-59 No Update Title Categories - two character fields specifying up to five categories of titles that are NOT to be updated. Both characters are required to identify the field.
60 Account Record - update a subset of the Account record ONLY at Library (see Appendix B).
61 Binder and Cost Record - update a subset of the Binder record ONLY at Library (see Appendix B).
62 Delete Title Records - delete title records at the Bindery that were deleted at the Library and vice versa.
63 Reserved: Reserved for future use.
Appendix B - Account/Binder Record Update Fields
The fields in the Account and Binder records that are updated at the Library during diskette restoration are listed in this section. Note that the fields are only updated if the associated restore criteria flag is set.
B.1 Updated Binder And Cost Fields
The Binder record fields to be updated are:
Field
Total number of items
Contract call lines
Contract imprint lines
Contract title lines
Contract vert. title lines
Contract Spine Width
Contract Board Height
Contract Board Width
Spine billing unit
Height billing unit
Width billing unit
Embosser Type
The entire Binding Cost record is updated.
B.2 Updated Account Record Fields
The Account record fields to be updated are:
Field
Font translations
Pitch translations
Text fitting rules
Default Binder ID
Extras/Specials
Leaf Attachment
Foil
Height Code
Width Code
Spine Code
Spine Limit